Managing Script State
Script state is any form of data that needs to persist between transactions. This can include things like token balances, NFT attributes, or authentication information. State data is stored in a cell's data field, just like the other data we have stored. However, in our previous examples the script logic had little meaningful interaction with any values stored within a cell.
To demonstrate how we can work with script state, we will build a basic counter type script. The cell's data area will hold a single number that must be incremented by exactly 1 each time it is included in a transaction. We will call this the "Counter" type script.
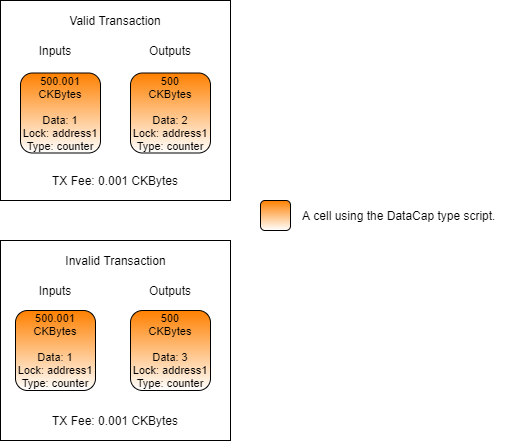
On the top left of the image is a transaction where the Counter type script is used. The data area of the input cell contains a value of 1, and the output cell contains a value of 2. The type script will execute without error and the transaction will process successfully.
On the bottom left is a similar transaction using the Counter type script. The input cell has a value of 1, and the output cell has a value of 3. This is incrementing by more than 1. When the type script executes it will return an error and this transaction would be rejected by the network.
Script Logic
Next, we will look at the logic and code that would be used to create this type script.
Let's take a look at it in pseudo-code first to understand the logic.
On lines 3 and 4, we count the number of cells in the group input and group output. We do this so we can make certain determinations about the structure of the transaction based on these counts.
On lines 6 and 7, we check if there are no input cells, and immediately exit the program with success if there are none. This is done because we are checking if there are any Counter cells that are being incremented. If nothing is being incremented, then nothing needs to be checked so we can safely exit.
Lines 6 and 7 also handle the scenario where a Counter cell is being created for the first time. In that case there would be no input Counter cell, but there would be an output Counter cell. This allows the cell to be created, and simply assumes that the data is in the correct format. We will demonstrate better ways of handling this in the next few lessons.
On lines 9 and 10, we check if the group input count and group output count are both 1, and we return an error if they are not. We are doing this to ensure that the transaction is conforming to a specific structure that we can check effectively. If the input and output are both exactly 1, we know we can properly validate that the Counter value is incremented.
On lines 12 and 13, we are loading the input and output values from the cell's data area. This is done by loading the first cell from each group, then converting the binary data in the cell's data area into an integer.
On lines 15 and 16, we take the input and output values and compare them. We ensure that the output value was increased by exactly 1, and if it is not, we return an error.
On line 18, we return successfully after no errors are found.
Now let's look at the real version of the Counter type script, written in Rust. This is located in the entry.rs file indeveloper-training-course-script-examples/contracts/counter/src.
Lines 1 to 10 are the usual imports of dependencies.
Lines 12 to 50 contain the main logic for our type script. The Rust syntax is a little more complex than our pseudo-code, but the code flow is nearly identical.
On lines 16 and 17, we count the number of cells in the group input and group output.
On lines 20 to 23, we check if there are no input cells, and immediately exit the program with success if there are none. Just like with the pseudo-code example, this also handles the scenario where a Counter cell is created for the first time.
On lines 26 and 29, we check if the group input count and group output count are both 1, and we return an error if they are not. We are doing this to ensure that the transaction is conforming to a specific structure that we can check effectively. If the input and output are both exactly 1, we know we can properly validate that the Counter value is incremented.
On lines 32 to 35, we convert the data from the group input cell to a u64 value.
On lines 38 to 41, we do the same for the group output cell and convert the data to a u64 value.
On lines 44 to 47, we take the input and output values and compare them. We ensure that the output value was increased by exactly 1, and if it is not, we return an error.
On line 49, we return successfully after no errors are found.
Usage in Lumos
Next, we will use the Counter type script in a Lumos example. Our code will deploy the type script code, create some cells using the Counter type script, then update the script state value stored in the data area.
The code we will be covering here is located in the index.js file in the Managing-Script-State-Example directory. Feel free to open the index.js file and follow along. This code example is fully functional, and you should feel free to modify and experiment with it. You can execute this code in a console by entering the directory and executing node index.js.
Starting with the main() function, you will see our code has four sections.
The initialization and deployment code is nearly identical to the previous examples, so we're not going to go over it here. Feel free to review that code on your own if you need a refresher.
Creating Cells
Next, we will look at the relevant parts of the createCells() function. This function generates and executes a transaction that will create cells using the Counter type script.
This code creates a single Counter cell and adds it as an output. The code is very similar to the code from previous lessons, but there are a few things we want to point out.
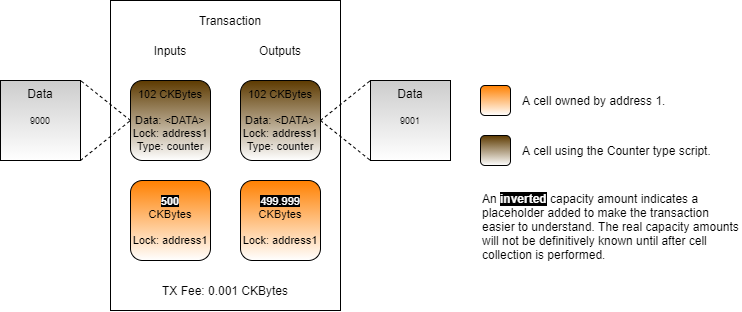
On line 2, the capacity of the cell is being set to 102 CKBytes. This is the minimum amount of capacity necessary for the Counter cell. A basic cell secured with the default lock and no type script or data is 61 CKBytes. The addition of the type script is 32 bytes for the codeHash, 1 byte for the hashType, and 0 bytes for the empty args. The data field is a 64-bit integer, which is 8 bytes. 61 + 32 + 1 + 0 + 8 = 102
On line 10 and 11, we define the data value for the Counter cell. The value must be converted to a 64-bit LE encoded hex string, which is the requirement of the Counter type script. Other encodings can be used as long as they match both in the transaction generation code and the on-chain script, but generally binary is the most space and computationally format for on-chain scripts.
The resulting transaction will look something like this.
Updating Cells
Now, we'll look at the relevant parts of the updateCells() function. This function generates and executes a transaction that will update the Counter type script's state.
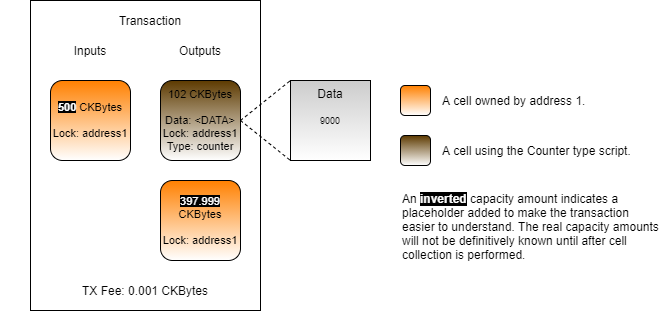
This adds the existing Counter cell as an input to the transaction, using the given out point from the previous transaction. We're using the out point instead of cell collection this time because it is a little easier to structure in this example since this Counter cell does not allow for burning. This will be covered later on.
On line 2, getLiveCell() contains a third parameter set to true. This is a flag indicating that data should be returned with the cell that is returned. Retrieving a cell and retrieving the data for a cell requires two different system calls, so we only request the data if it is needed.
On line 3, we take the data from the input Counter cell and decode it from hex-encoded binary to a BigInt. This value will be used again during the creation of our output Counter cell.
This code adds a Counter cell to the outputs with the updated value. This code is nearly identical to the code in the createCell() transaction, except that on line 10, we insert an updated value that is exactly one higher than the input value.
The resulting transaction will look similar to this.
As we mentioned in an earlier lesson, a cell is an immutable structure. When an output cell is added to the blockchain in a transaction, it cannot be altered. Therefore, when we "update" a Counter cell, we are consuming the input Counter cell, and creating a new output Counter cell.
There is no direct association between the input cell and output cell. It is important to keep this in mind while developing scripts because the script logic must reflect this in order to process the transaction correctly. We will learn more about this in our next lesson.
Last updated