Loading...
Loading...
Loading...
Loading...
Loading...
Loading...
Loading...
Loading...
Loading...
Loading...
Loading...
Loading...
Loading...
Loading...
Loading...
Loading...
Loading...
Loading...
Loading...
Loading...
Loading...
Loading...
Loading...
Loading...
Loading...
Loading...
Loading...
Loading...
Loading...
Loading...
Loading...
Loading...
Loading...
Loading...
Loading...
Loading...
Loading...
Loading...
Loading...
Loading...
Loading...
Loading...
Loading...
This lesson plan is designed to teach developers, who are familiar with blockchain, how to build common application components on Nervos CKB L1. We will walk through a series of examples and lab exercises designed to help you learn the essentials through practical hands-on experience.
Nervos' L1 blockchain uses the Cell Model, which is a smart contract platform inspired by the Bitcoin UTXO Model. This is significantly different from Ethereum EVM and is not compatible. The Cell Model is considered to be more flexible and efficient, but it is also much more challenging. If you were looking for more information on our 100% EVM-compatible solution on Godwoken L2, please visit StartWithNervos.com.
These are the technologies used in this lesson series that a developer needs to be familiar with in order to have a complete understanding of all concepts and tooling. If you're unfamiliar with one of these technologies, it is recommended that you use the provided links to learn about the topic as needed so you can fully complete the course.
You will need to have a basic understanding of Bitcoin, Ethereum, Smart Contracts, Tokens, and other similar concepts.
You will need to be comfortable with JavaScript in order to work with the code in the lab exercises. Knowledge of TypeScript is also helpful since it is recommended for development, but our examples will primarily use plain Javascript.
Rust is used to write on-chain smart contracts. You will need to be proficient in Rust to write your own smart contracts. We try to keep our lab exercises as simple as possible but you should check out one of the tutorials if you find you're having trouble understanding the lessons.
Most of our examples will be performed on a Linux console, so familiarity with a common Linux distribution is highly beneficial. Most of the commands should also work without modification on MacOS and in Windows WSL2.
These exercises in this course are designed to be completed in sequential order. Each new exercise builds upon the previous, so it is recommended that you do not skip any sections.
We have created a chatroom for everyone who is taking the course. Join us on Discord in the #developer-training-course channel. Feel free to ask any questions you may have, or just tell us how well the course is working for you. Your feedback helps make the course better for everyone!
One of the unique challenges with the Cell Model is how to effectively manage cells and the capacity contained within them. The Nervos CKB blockchain contains millions of live cells, and a developer must be able to locate the cells they need both for their own accounts, and for the accounts of the users they support in their dapps.
An indexer is a piece of software that helps speed up the process of locating cells and allows the developer to query for cells based on their attributes.
An indexer monitors for new block data, and then extracts and organizes the cell information so it can be more quickly located when needed. Dapp frontends and backends can then interface directly with the indexer to query for information about cells.
The way that indexers have been implemented changed over time, so you may see them referenced as a separate stand-alone node or as part of the CKB node. In the newest generation of node software, the CKB node includes the indexer functionality. This will need to be enabled adding "Indexer" to the modules array in ckb.toml, as seen below.
After adding the Indexer module to ckb.toml, restart the CKB node to activate it.
Below is some basic Lumos code to verify that the Indexer functionality is enabled and running properly.
On lines 6 and 7 we define the CKB node RPC URL and the CKB Indexer RPC URL. These are the same value because the new versions of the CKB node now include the indexer functionality, where it had previously been a separate server.
On line 9 we start with initializeConfig(CONFIG). This uses the config.json file in your current working directory to initialize Lumos.
On line 10 we create a new instance of Indexer which will pass requests to the CKB Indexer node JSON RPC which we specified.
Finally, on line 14 we use indexer to retrieve and display the most recent tip block on the console.
Up until this point, we have been manually doing cell collection through ckb-cli or by using the outputs of transactions we just recently created. Of course, this is not an effective way of doing things in a real dapp. Cell collection needs to be done quickly and automatically.
Lumos has a class called CellCollector which is designed to help with cell collection, but it requires some additional code to be used for our purposes. Here is the collectCapacity function that exists in the main shared library of the Developer Training Course repo lib/index.js.
This function is used to collect cells for use as capacity in a transaction. It uses a CellCollector instance to query the indexer to find live cells.
Looking at line 15, it takes the following arguments:
indexer is an instance of the Lumos indexer that is initialized and fully synced with a Nervos CKB node.
lockScript is something we will cover in one of the next lessons. For now, think of it as the owner of a cell.
capacityRequired is the amount of CKBytes, in Shannons, that are needed to complete our transaction.
Looking at line 17 we see this:
This JSON object is describing attributes of cells that we want to locate. In this case, they are cells which are owned by the specified lockScript and do not have a Type Script.
The rest of the code should be fairly easy to understand. It continuously gathers live cells that match the query until we have the required capacity, or it errors if there are not enough cells to meet the requirement.
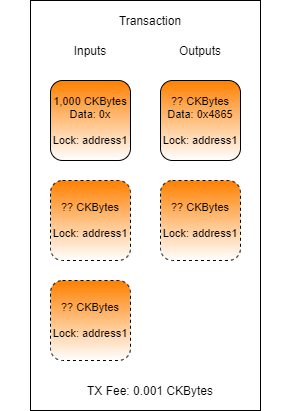
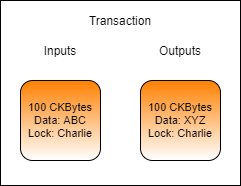
Let's say that Charlie wants to send Bob 100 CKBytes. If Charlie had a cell that contained exactly enough CKBytes, this would be a very straightforward transaction.
In this transaction, Charlie uses a cell that has exactly 100.0001 CKBytes. Exactly 100 CKBytes is sent to Bob, and the remaining 0.0001 CKBytes is used at the transaction fee. It is very unlikely that this scenario would occur in reality, since the exact amounts present in cell are very unlikely to match the exact amounts needed for the transaction.
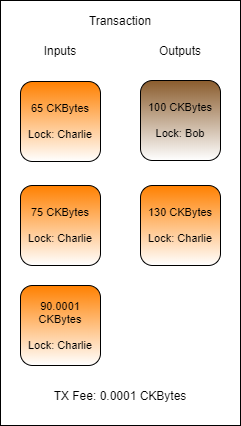
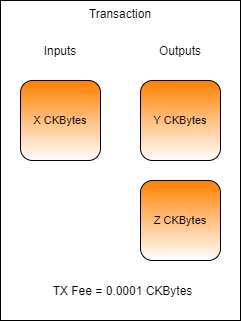
Here is a slightly more realistic transaction example. Cell collection was performed to gather at least 100.0001 CKBytes to send to Bob and pay transaction fees. Two cells were found for 65 CKBytes and 75 CKBytes, for a total of 140 CKBytes. Now there is enough capacity to pay Bob 100 CKBytes, pay a 0.0001 CKByte transaction fee, and the remaining 39.9999 CKBytes can be sent back to Charlie as change.
However, this transaction has a problem and would be invalid. Can you spot the problem?
The problem with this transaction is that the change cell has 39.9999 CKBytes, but as we covered earlier, the minimum capacity of a cell is 61 CKBytes. This is because a cell must have enough capacity to cover its own overhead for data storage, which is 61 bytes for a basic cell.
To solve this, another round of cell collection must occur to gather enough capacity to properly structure this transaction.
Cell collection continues, and a third input cell is found with 90.0001 CKBytes. Now there is enough input capacity to create the change cell and this transaction would be successful.
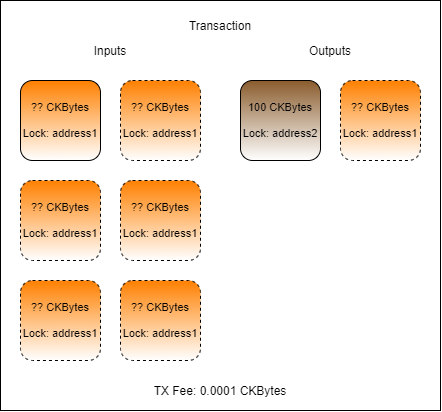
Complete the transaction in index.js found in the folder Lab-Implement-Automated-Cell-Collection-Exercise by adding code and values as necessary.
The transaction you create should have one or more inputs from address1, one output to address2 for 100 CKBytes, one change cell back to address1if necessary, and a TX fee.
Populate the txFee variable with a 0.001 CKByte fee.
Hint: The fee value must be given as a BigInt value expressed in Shannons. There are 100,000,000 Shannons in a CKByte.
Populate the outputCapacity1 variable with exactly 100 CKBytes. This will be sent from address1 to address2.
Hint: Capacity values added to the cell output structure must be in Shannons, and expressed as a hex value. Don't forget to use intToHex() and ckbytesToShannons().
Populate the capacityRequired variable with the amount of capacity required for the transaction.
Hint: The amount of capacity required will be the amount of capacity in outputCapacity1 but a change cell is also needed.
Populate the {inputCells} variable with cells automatically collected using the collectCapacity() function.
Hint: Look at the shared library file lib/index.js if you need to see the syntax for usage.
Populate the outputCapacity2 variable with the amount of change needed.
Hint: This should properly account for the inputCapacity, the outputCapacity, and the txFee.
Populate the output2 variable with the JSON structure for an output cell to use as change back to address1.
Hint: You can copy the structure from output1 to use as a reference.
Run your code by opening a terminal to the Lab-Implement-Automated-Cell-Collection-Exercise folder and running node index.js. If you get stuck you can find the solution in the Lab-Implement-Automated-Cell-Collection-Solution folder.
Once your code successfully executes, the resulting transaction ID will be printed on the screen.
Developers who are learning about Nervos for the first time are recommended to do some light reading to get a high-level overview of how the platform works, and why it is beneficial to build on Nervos. This will help serve as a foundation for the new concepts we will introduce during the course.
These materials give a high-level introduction to anyone who is unfamiliar with the technology that powers the Nervos platform.
The Nervos Nation YouTube Channel is another great resource for learning about what makes Nervos different, and it is managed entirely by members of the Nervos community.
These materials cover similar topics to the recommended materials but are much more in-depth. Reading these is optional.
From account ckt1...gwga, send 100,000 CKBytes to a newly created account using ckb-cli.
Use the command account new to create a new account.
Use the command account list to see all your addresses.
Use the command wallet transfer to send CKBytes.
Once submitted, your transaction ID will be printed on the screen. We will use this in the next section, so be sure to copy this value somewhere that it can be retrieved later.
In order to follow along with the examples and complete the lab exercises, some basic software and tooling will need to be installed on your computer.
Our examples are all created using a Linux environment, and this is the preferred environment for development on Nervos in general. It should also work for MacOS and Windows, but there may be a few extra steps you will need to take to get things working.
Our lessons and lab exercises all rely on Node.js v18 LTS, so this will need to be installed prior to starting. We officially support and test only with this exact version. If you experience any problems, please make sure you are using the correct version of Node.js.
Installing vanilla Node.js is fine or you can use a tool like NVM to manage the installation. Many developers prefer using NVM since it allows you to quickly select between different versions of Node.js without having to reinstall.
Vanilla Node.js (All Platforms): https://nodejs.org/en/download/
NVM (Linux & MacOS): https://github.com/nvm-sh/nvm
NVM (Windows): https://github.com/coreybutler/nvm-windows
We will be using the Rust programming language to create on-chain scripts and install the required tooling. Using rustup is generally recommended, but there are several methods available.
Rust (All Platforms): https://www.rust-lang.org/tools/install
You will need Git to clone the example code and lab exercises from GitHub in order to complete each lesson. Using your favorite Git client is fine.
Git (All Platforms): https://git-scm.com/downloads
Use the command below to clone the Developer Training Course materials, which includes the example code and lab exercises we will use in the lessons.
Then enter the directory and install the Node.js dependencies.
While installing dependencies using npm i you may get some warnings. This is normal and does not always indicate a problem. If you encounter errors, make sure you are on the correct version of Node.js by using the command node -v.
You will need to have a CKB Dev Blockchain node running locally for our code to interact with. This is a full Nervos CKB node that will run on your computer with a private testnet, also known as a devnet.
You will need to complete the setup instruction from the URL below for the sections "Setup a Dummy-Worker Blockchain" and "Adding the Genesis Issued Cells".
CKB Dev Blockchain Setup Instructions: https://docs.nervos.org/docs/basics/guides/devchain
Alternatively, if you are using an OS with a GUI you can use Tippy to create a one-click devnet.
Tippy One-Click Devnet CKB Node Tool: https://github.com/nervosnetwork/tippy
After you have created your devnet, you will need to copy some of the chain configuration values into the developer-training-course repo. The scripts we will be using require this information about the devnet in order to locate resources to create transactions properly.
From the console, enter the directory where you have your devnet CKB Node, and run the following command.
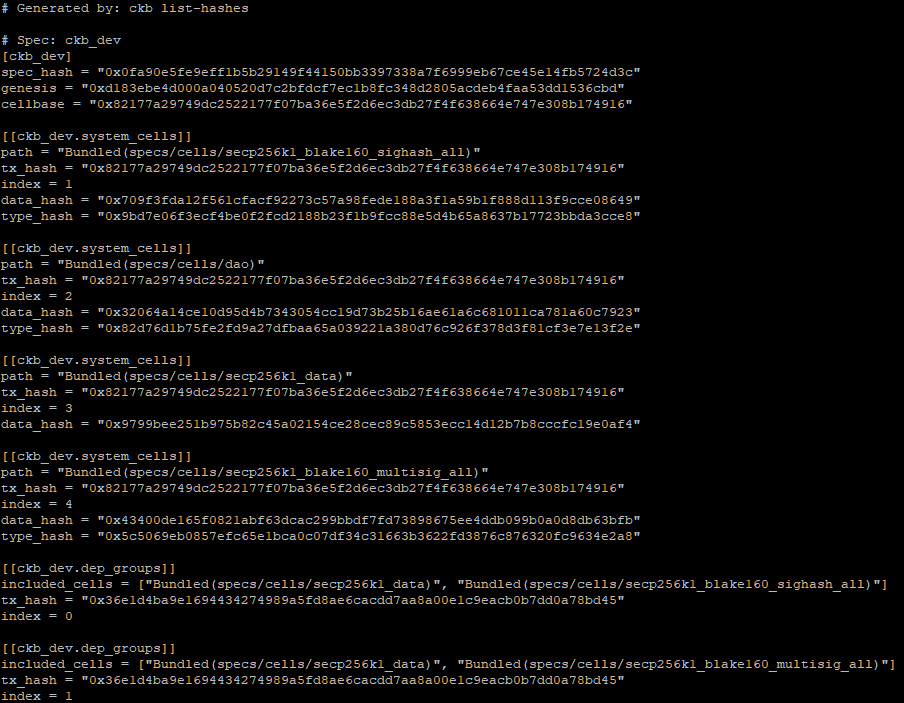
This should give you console output similar to the following.
The system cell hashes are specifically the ones we are interested in. These describe the locations of resources the Developer Training Course will need. You will need to copy these values into the file developer-training-course/config.json in the correct locations. This config.json file will be used by the Lumos framework in the later lessons to create transactions.
The table below describes the values that need to be updated in config.json, and where they come from the output from ./ckb list-hashes. The format of config.json and the output of ./ckb list-hashes are structured differently, so you will need to match them up manually.
For example, the SECP256K1_BLAKE160 key in config.json corresponds with the config group that contains the line included_cells = ["Bundled(specs/cells/secp256k1_data)", "Bundled(specs/cells/secp256k1_blake160_sighash_all)"]. The values for SECP256K1_BLAKE160.TX_HASH and SECP256K1_BLAKE160.INDEX are contained in the lines directly underneath.
A total of six values should be updated in total. This process only needs to be done once, but if you set up a new dev chain, you will need to repeat this process since the values will be different.
config.json
ckb list-hashes
SECP256K1_BLAKE160
Bundled(specs/cells/secp256k1_blake160_sighash_all)
SECP256K1_BLAKE160.TX_HASH
tx_hash
SECP256K1_BLAKE160.INDEX
index
SECP256K1_BLAKE160_MULTISIG
Bundled(specs/cells/secp256k1_blake160_multisig_all)
SECP256K1_BLAKE160_MULTISIG.TX_HASH
tx_hash
SECP256K1_BLAKE160_MULTISIG.INDEX
index
DAO
Bundled(specs/cells/dao)
DAO.TX_HASH
tx_hash
DAO.INDEX
index
Determine and validate the out points for the two outputs from the transaction in the previous lab exercise.
An out point is the tx_hash (transaction id) of the transaction and the index of the output in the transaction.
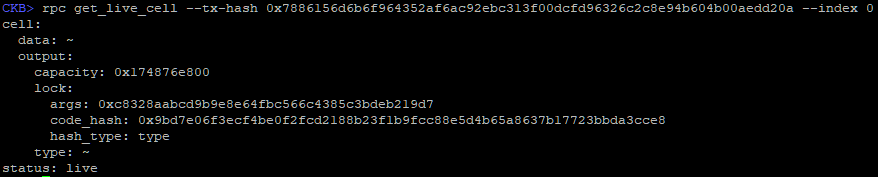
Once you have your out points, verify that they are valid and the status is "live" using the rpc get_live_cell command in ckb-cli. It will also return a lock_arg (cell.output.lock.args) which you will also need. We will explain exactly what this terminology means in the next lesson.
Once you have verified your out points, copy both of them along with the lock_arg somewhere that they can be retrieved later. We will be using them in the next lesson.
Transactions are the basis for anything that occurs on-chain. Let's look at what constitutes a valid transaction, and what the lifecycle is for a transaction.
Any change in state that occurs is the result of a valid transaction being submitted and accepted by the network. On Nervos, only transactions that are valid are recorded to the blockchain. This is different than on Ethereum and platforms similar to it, where even a transaction that results in error is still recorded to the blockchain.
As a developer, your goal is to always produce valid transactions. To do this consistently, you need to know the rules to follow.
In order for a transaction to be considered valid, there must be at least one input cell. Remember, a transaction is how a change in state is described. Without an input cell, there is no state to change, and no way to pay transaction fees. Therefore, there must always be at least one input cell in a valid transaction.
All input cells in the transaction must be authorized to be consumed. This means they must be live cells, and in most cases, this means that the transaction must be signed using the private keys of the owners of the input cells. This is very similar to other blockchains, which also rely on private keys for authorization. However, Nervos is much more flexible in how authorization can be provided, opening new possibilities which we will cover in a later lesson.
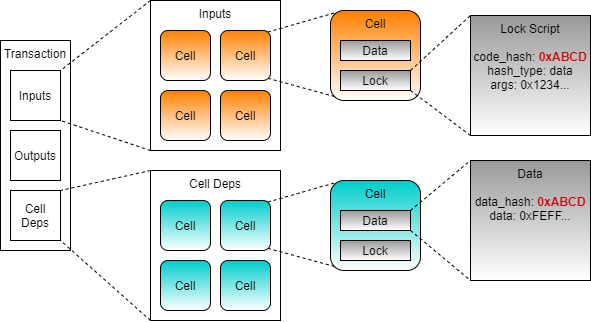
Nervos uses small programs called "scripts" to achieve smart contract functionality. Each cell must include a "Lock Script", which determines the authorization mentioned above. Each cell can also optionally include a "Type Script" to include custom logic. We will cover Type Scripts in detail in the later lessons. The important takeaway right now is that when a transaction executes, all Lock Scripts and Type Scripts present on all cells must execute successfully without error. If even one script in the transaction returns an error, then the entire transaction is invalid.
Every cell must have a capacity equal to or greater than the number of bytes occupied by the cell on the blockchain. This includes any assets or data held within the cell, as well as the overhead of the cell's data structure itself. In most cases, this means that the minimum capacity required by a basic cell is 61 bytes.
The capacity requirement exists both at the cell level and the transaction level. In order for an output cell to have 61 bytes of capacity, there must be an input cell with at least 61 bytes of capacity (+ TX Fees). If the total capacity of the output cells exceeds that of the input cells, then the transaction is invalid.
Every transaction that is submitted to the network must include a fee paid in CKBytes. This fee is paid to miners for verifying and processing transactions and for providing security to the network. Fees are based both on the size of the transaction and the amount of computing resources required to process it.
Just like with other blockchains, a fee market is used to prioritize transactions that have paid a higher fee rate. However, unlike most other blockchains, transaction fees are not the only economic incentive for miners. The result is less upward pressure on transaction fees, allowing them to remain lower without sacrificing security. We'll learn how to calculate transaction fees in a later lesson.
Let's examine the transaction that was created in the last lab exercise using ckb-cli. You will need the transaction ID that was generated from the last lab exercise, so make sure it's handy.
To get the details of a transaction you use the rpc get_transaction command in ckb-cli. In the command below, replace <TRANSACTION_ID> with the transaction id you generated in the last lab exercise.
Your output should look similar to the above, but some of your hashes will be different.
The two sections we will focus on are the inputs and outputs. All the other sections can be ignored for the time being. If it seems confusing as we're going through it, don't be intimidated. By the end of this lesson, it should be much more clear.
In the previous lab exercise, you were asked to send 100,000 CKBytes between two accounts. Looking closer that the outputs, you should see something familiar.
One of the outputs has 100,000 capacity. Remember, capacity is another way of describing the CKBytes. This is the 100,000 CKBytes that was transferred from the sending account to the receiving account.
Below that you see another output with 199,999.9999 capacity. This is the change of the transaction. Think of it like paying for a $5 item with a $20 bill. You would hand your $20 to the cashier, and they would hand you $15 back as change. This is the same basic process but in a purely digital system, our bills are often not in the same denomination.
The CKBytes in the outputs had to come from somewhere, and that place is the inputs. There is one input and it has a previous_output with a tx_hash and index as a reference.
Every input is an output from a previous transaction, and that's why it's called a "previous output" in ckb-cli. A transaction can have many outputs, which is why the index is specified in addition to the tx_hash. The combination of a tx_hash and an index is called an "out point", and it is used to describe where an output originates from. An out point is sometimes represented as two values, and sometimes represented as a single value in the format <tx_hash>-<index>.
If you use ckb-cli to lookup the tx_hash from the previous_output of the input, you will get similar output. Remember, every input is an output from a previous transaction. This ensures that everything is always accounted for and every CKByte has a traceable history in the blockchain.
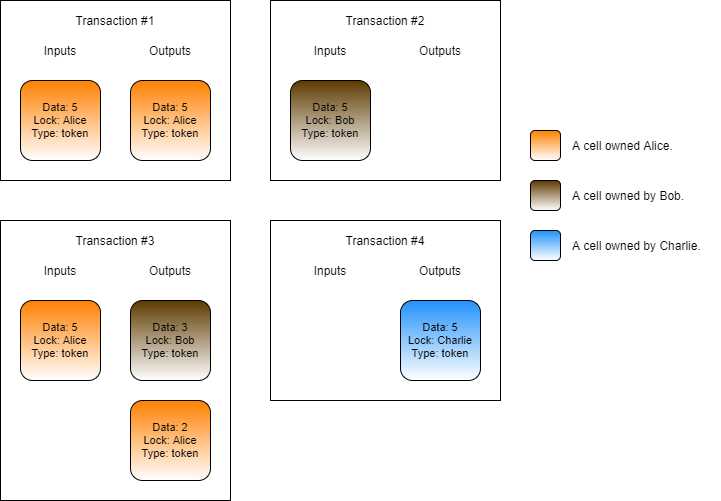
Below is a diagram that shows how inputs and outputs are related, and how CKBytes can move around between transactions. Note: TX fees are omitted to keep it more simple.
TX1 has an input of 1,000 CKBytes, which is split into three outputs of 200, 300, and 500.
TX2 is using an output from TX1, and has two outputs of 100 and 100.
TX3 is using an output from TX1, and has two outputs of 100 and 200.
TX4 is using an output from TX2, and has a single output of 100.
TX5 is using multiple outputs from TX2 and TX3, and has a single output of 400.
An output can only be used once as an input. After that, it is marked as "spent" and cannot be used again. This is how the protocol ensures that the same CKBytes cannot be spent in two places. The inputs and outputs have been colored to indicate which have been spent (red), and which are still unspent (green).
An unspent transaction output is more commonly known as a UTXO, and this is the foundation of the UTXO model that Bitcoin is built on. If you want to read more on UXTO, you can optionally do so here. Nervos' model is inspired by Bitcoin's UTXO model, so you will find that many of the concepts and terminology is used interchangeably.
The formatting on the inputs and outputs is different, so it's hard to compare. In the image above we updated the formatting of the inputs to match the outputs. This will make it easier to compare the capacity values to understand what's going on.
With this new image, the amounts should start to make more sense. The inputs have a total of 300,000 CKBytes. The outputs have one for 100,000 CKBytes, and one for 199,999.9999 CKBytes, for a total of 299,999.9999 CKBytes.
There is a difference of 0.0001 CKBytes. This difference is the transaction fee that we specified when sending the transaction. Whenever there is an unaccounted difference in CKBytes between the inputs and outputs, that is the fee paid to miners for processing the transaction. You can think of this as leaving a tip on the table at a restaurant after you've paid what was listed on the bill.
With the transaction fee taken into account, the CKBytes are now 100% accounted for.
The sender started with 300,000 CKBytes.
The sender sent 100,000 CKBytes to the receiver.
The sender sent 199,999.9999 CKBytes back to themselves as change.
The sender paid a 0.0001 CKByte transaction fee to the miners.
Lumos is a dapp framework. It is used for both frontend and backend dapp development and is very useful for creating transactions and interacting with the blockchain.
Open the index.js file from the Introduction-to-Lumos-Example folder in the Developer Training Course repo you cloned from GitHub. If you don't have this, go back to the Lab Exercise Setup section for instructions on how to clone it from GitHub.
This code in index.js will generate a basic transaction with one input and one output. We will be generating a real transaction on your CKB Dev Blockchain, but the code you see here is simplified to make it easier to follow.
The input cell that the code uses will be specified by one of two out points you verified in the last lab exercise. The output that is created is a change cell that returns the CKBytes back to the same account, minus the transaction fee.
Starting at the top of the file, we have the includes.
We have a few includes from Lumos framework, but most are from our shared library, utility library, and lab library. The shared library contains some functions to handle common operations. The utility library contains some basic converters and formatters. The lab library is used to set up and validate lab environments and make concepts easier to understand.
You can dive in deeper and read through all the code being used behind the scenes to make a lab work, but in most cases, you will probably find that this is of limited benefit. The labs are designed to focus on understanding the core concepts needed to build a dapp since that is what is most important. The functions and methods being used at the framework level will change and become outdated over time, but the core concepts of how we approach building a dapp are likely to change much less.
Next, you will see a group of variables, which we will explain.
The NODE_URL constant is set to the URL of the CKB Dev Blockchain you set up in the Lab Exercise Setup section.
The PRIVATE_KEY constant is set to the key used to sign transactions. This is the private key for the account ckt1...gwga which contains some genesis issued CKBytes. You may recognize this address from when you executed account list in ckb-cli.
The ADDRESS constant is set to the CKB address of the account being signed, and is set to the same account as the PRIVATE_KEY.
The PREVIOUS_OUTPUT constant will be set to the out point of a live cell to be used in this transaction.
The TX_FEE constant is the amount of transaction fee to pay, in a measurement unit called "Shannons". There are 100,000,000 Shannons in a CKByte, just like there are 100,000,000 Satoshis in a Bitcoin.
We'll walk through each line of code to give a deeper explanation of what is happening.
Lumos must be initialized with a configuration file before it can be used for the first time. This configuration file is named config.json, and it is normally found in the current directory where your script executes from. This is already set up for you in the developer training course repo.
This creates a Lumos transaction skeleton. This is an empty transaction structure that we will populate with information, like what cells to consume as inputs, and which to create as outputs. We will then use this transaction skeleton to generate a real transaction that is sent to the CKB node via RPC, and broadcast to the network.
This adds in the required cell deps. Cell deps is short for cell dependencies, and we will cover exactly what this is in a later lesson. For now, think of them as libraries needed for the transaction to complete.
This creates an input from a live cell using the out point you specified in the previousOutput variable, then adds it to the transaction.
The transaction skeleton is built with the ImmutableJS library, which is why it uses the update() syntax. Check out their documentation if you need more information on the syntax and usage.
This creates an output for a change cell with the same capacity as the input, minus the TX fee. The lock defines who the owner of this newly created cell will be, and that is defined with the ADDRESS constant. We will explain type and data in a later lesson.
The addressToScript() function in Lumos converts an address to a script data structure, which is the form required by Lumos. An address is actually just an encoded and shortened version of a script, so the two can be converted back and forth easily. We will learn more about addresses and scripts in a later lesson.
The Witness is the part of the transaction that holds all the data provided with a transaction to prove its validity. This includes signatures that prove the owner of the input cells authorized their usage in the transaction. The structure of Witness requires specific formatting, which we will cover in a later lesson.
The addDefaultWitnessPlaceholders() shared library function creates this structure for us and adds in the required placeholders for the most common basic usage scenario.
This prints the current transaction to the screen in an easy-to-read format. The describeTransaction() function is part of the shared library and is provided as an easier-to-read alternative to the normal viewing of transactions as JS objects, which may include all kinds of extra information that isn't relevant right now.
This signs the transaction using the private key specified in the PRIVATE_KEY variable using the Secp256k1 algorithm. Signing the transaction authorizes the usage of any input cells that are owned by that private key. The signTransaction() shared library function is another facade used to simplify readability.
This sends the signed transaction to the local CKB Dev Blockchain node and prints the resulting TX hash to the screen. If you watch your CKB node output in another terminal window you should see it confirm shortly after submission.
This waits for the transaction we just sent to confirm before we continue. The waitForTransactionConfirmation() shared library function that uses the CKB node RPC to continuously check the status of a transaction, waiting for it to confirm before proceeding.
Now scroll back up to the top. We need to change the PREVIOUS_OUTPUT value to match one of the out points you verified at the end of the last lesson. You should have verified two out points. The out point you want is the one that is owned by the address ckt1...gwga since that is the private key we are using. Hint: The lock_arg which you recorded can be used to match it with the address. Use the ckb-cli command account list to find out the lock_arg for the matching testnet address. We will cover the purpose of what a lock_arg is in the next lesson.
Note: Make sure you are using the out point owned by the address
ckt1...gwgaor the transaction will fail! This means you must have the correcttxHashandindex.
After you have updated the code with the proper out point, open up a terminal and execute the command node index.js from within the code directory to run the code. Your output should be similar to that below. Record the TX hash since we will use it again later.
Within a few seconds, your transaction should confirm. You can use the ckb-cli command below to check the status of the transaction. The transaction is confirmed once the status at the bottom of the output reads status: committed.
Go back to the terminal where you ran the code, and try executing the code again. Can you guess what will happen before running it? Run the code again using the same command as before: node index.js.
You should get the following error:
The reason we received this error is that the out point we specified in the code has already been used. Using a live cell as an input will consume it and transform it into a dead cell. This can only occur a single time, which is why we received that error when trying to use it again.
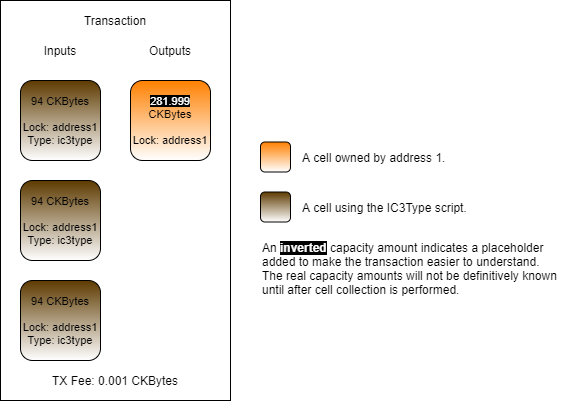
Complete the transaction in index.js found in the folder Lab-Store-a-File-in-a-Cell-Exercise by adding code and values as necessary.
The transaction you create should have one or more inputs from address1, one output to address1 with the data set to the contents of the file HelloNervos.txt one change cell back to address1if necessary, and a TX fee.
Populate the txFee variable with a 0.001 CKByte fee.
Hint: The fee value must be given as a BigInt value expressed in Shannons. There are 100,000,000 Shannons in a CKByte.
Populate the hexString variable with the contents of the files/HelloNervos.txt encoded as a hex string.
Hint: Use the Node.js native functions to read the file to a Buffer, then use .toString("hex") to convert it to a hex string.
Populate the dataSize variable with the size of the data.
Hint: The size of the data should be in binary format, not hex string format.
Populate the outputCapacity1 variable with the minimum amount of CKBytes necessary to create a cell with the data being included.
Hint: Capacity values added to the cell output structure must be in Shannons, and expressed as a hex value. Don't forget to use intToHex() and ckbytesToShannons().
Populate the output1 variable with the JSON structure for an output cell that is owned by address and has the data from hexString.
Hint: You can copy the structure from output2 to use as a reference.
Run your code by opening a terminal to the Lab-Store-a-File-in-a-Cell-Exercise folder and running node index.js. If you get stuck you can find the solution in the Lab-Store-a-File-in-a-Cell-Solution folder.
Once your code successfully executes, the resulting transaction ID will be printed on the screen.
We will begin by sending a basic transaction using the ckb-cli command-line tool. You will need to be running a CKB Dev Blockchain in order to complete this lesson. A node configured for the Testnet or Mainnet will not work properly. If you haven't already set one up, go back to the Lab Exercise Setup section and make sure you have completed the setup as directed.
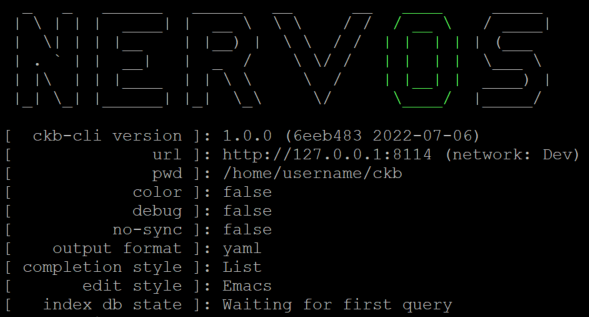
Launch ckb-cli in your console. You should be presented with a screen similar to this.
Note: In my examples, I have disabled colored output to make it easier to read on a black terminal background. If you have difficulty with colors on your screen, use the command config --color to toggle them on and off.
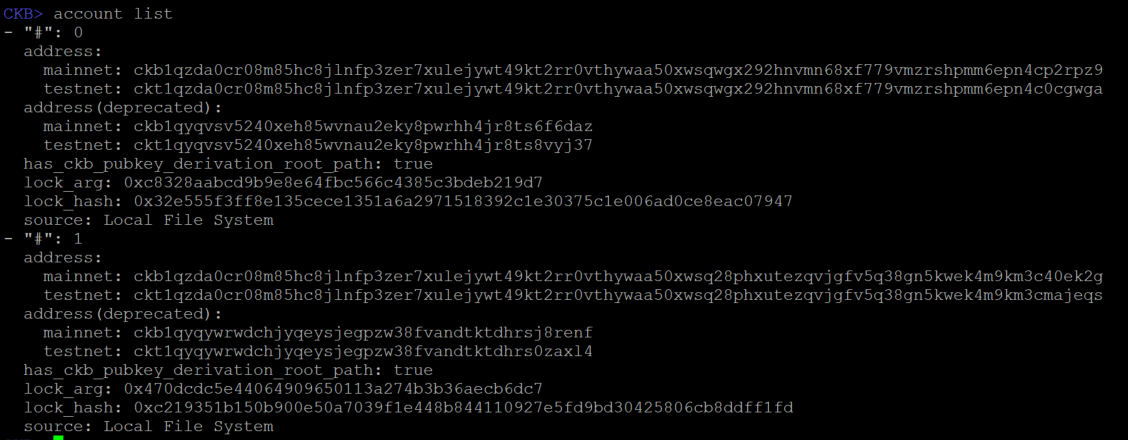
Use the command account list to show the accounts that are being managed by ckb-cli.
If you followed the Lab Exercise Setup instructions completely, you should see the same two accounts on your screen. These are two special accounts that are used only on dev blockchains. When the dev blockchain is created, these accounts are issued a very large amount of CKBytes, the native token of Nervos. Our examples will use these accounts often since they have plenty of CKBytes.
On the screen, you may see some terminology that isn't familiar. We will cover everything eventually, but for now, we're only going to cover addresses.
An address on Nervos CKB is similar to other blockchains. It indicates a source or destination within a transaction. The address itself is a special encoded value that specifies both an identity and how it should be accessed and also includes a checksum value so it cannot be typed incorrectly.
Different addresses exist for use on the mainnet or on testnets. Each address can only be used on their respective network. Trying to use a testnet address on the mainnet will always fail. This prevents mistakes from being made when moving between a testnet and mainnet.
If you look closely at the output, you should see testnet address ckt1qzda0cr08m85hc8jlnfp3zer7xulejywt49kt2rr0vthywaa50xwsqwgx292hnvmn68xf779vmzrshpmm6epn4c0cgwga. We are working with a devnet, which is a kind of testnet, so this the address we will be using. To keep things readable more readable, going forward we will abbreviate addresses using the first four and last four letters. ie: ckt1...gwga
Note: If you do not see address
ckt1...gwgain your address list, then go back to the Lab Exercise Setup and double check that you have properly completed the second step, "Adding the Genesis Issued Cells".
To send CKBytes from one account to another we will use the wallet transfer command. Copy and paste the following command to send 1000 CKBytes between the two accounts:
You will be prompted to enter a password. This is the password you selected when you first imported the accounts during the Lab Exercise Setup.
Let's break down the parameters one at a time.
--from-account This specifies the account to send CKBytes from.
--to-address This specifies the account to send CKBytes to.
--capacity This is the amount of CKBytes we are sending. We will explain why it's called capacity later on. For now, just think of it as a synonym for CKBytes.
Once submitted, you will be presented with a long hex value. This is the transaction ID, also known as the transaction hash. Your value will be different than in our screenshot.
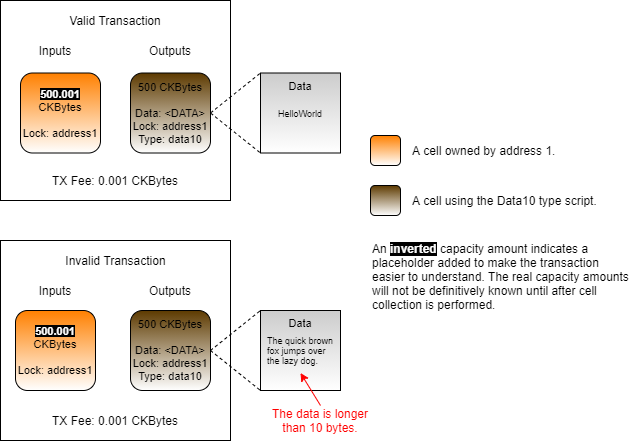
A cell can be used to store any kind of data that is desired by the developer. However, the cost of storing state data on a globally decentralized blockchain is high when compared to normal or cloud-based storage. This means that some types of data are more appropriate than others.
Bitcoin often uses the comparison of blockchain storage to prime real estate. This comparison is also used for Nervos, but in an even stronger sense. Possessing one CKByte gives the holder the right to store one byte of data in the blockchain state. This makes a CKByte similar to a real estate deed.
In order to store one megabyte of data on Nervos, you would need to hold 1,048,576 CKBytes. This makes the storage of large data prohibitively expensive for large files. Notice that I said hold CKBytes and not pay CKBytes. This is because those CKBytes can be reclaimed once the data is removed from the state.
CKBytes are used to pay state rent while a cell occupies blockchain state. A cell must have at least enough capacity (CKBytes) for the space the cell occupies in the blockchain state, including all data within it. The CKBytes are effectively locked in the cell until the cell is consumed. During this time, the CKBytes locked in a cell are subject to targeted inflation. This inflation pays the state rent indirectly, requiring no action from the owner of the cell.
When CKBytes are locked they are ineligible to use the NervosDAO, which pays users interest on their CKBytes. This interest is equal to the inflation which pays the state rent, effectively negating it, and making the CKByte a deflationary currency similar to Bitcoin.
For more information on this topic, you can read the Crypto-Economic White Paper. This is optional but will give much deeper insight into how the economics of Nervos work.
There are three main methods of storing data in a cell:
Using ckb-cli is convenient for one-off files.
Using Lumos Framework is the most common way for dapps to generate cells with data.
Using Capsule Framework is a common way to deploy scripts created with Capsule.
Under the hood, all three methods ultimately rely on RPC calls to a ckb node, but it's much less common to interact directly with the RPC. We will demonstrate ckb-cli and Lumos now, and Capsule will be introduced later.
Open a terminal and enter the top level of the developer-training-course folder. From there, execute the following command:
This will create a new cell that contains the contents of the file HelloNervos.txt. The capacity of the new cell is exactly 74. This is because the size of HelloNervos.txt is 13 bytes. If you remember from earlier, the minimum capacity for a standard cell is 61 bytes. The minimum capacity requirements are always for the total space a cell occupies, which includes both the data in the cell and the overhead of the structures that comprise the cell itself. The cell structures take 61 bytes, the data takes 13 bytes, and 61 + 13 = 74.
Now let's look at the cell that was just created. Execute the following command, replacing the TX Hash with the transaction from the wallet transfer command we just executed above.
Your output should be very similar to this:
The hex-encoded content of 0x48656c6c6f204e6572766f7321 decodes to Hello Nervos!, which is the content of the file HelloNervos.txt. The data hash value of 0xaa44a1b32b437a2a68537398f7730b4d3ef036cd1fdcf0e7b15a04633755ac31 is the hash of the content itself.
To verify, let's check the hash of the file itself using this command:
The output should match the data hash value from the previous command.
Looking at the output capacity, we have a value of 0x1b9130a00. When decoded back to decimal, it is a value of 7,400,000,000. The value is in Shannons, which means this is exactly 74 CKBytes.
Storing data using Lumos is very similar to what you've already done in previous labs. Here is an example of the JSON structure used as an output in previous code examples:
The data field is a hex string of the data to create the cell with. The process to add data is simple. Replace this with the hex string for the data desired, and adjust the capacity if necessary to accommodate the extra storage required by the data.
Looking at the code example in the folder Storing-Data-in-a-Cell-Example, we see the code equivalent of the ckb-cli command we used earlier.
On line 2 you see the text "Hello Nervos!" encoded as a hex string. On line 3 we calculate the size of the data if it was decoded back to binary. On line 4 we use that information to calculate the capacity needed for the cell, which is equal to the base requirement of 61 CKBytes plus CKBytes equal to the amount of data being stored. On line 5 we specify the data for the cell using the hexString provided from out function.
In a terminal, open the Storing-Data-in-a-Cell-Example directory and then execute the example using node index.js. The example should execute successfully and print a transaction hash. Using this hash with the command below:
Your output should match that of this below.
If you compare this with the output from earlier, it should be identical. We have created two different cells, but the data contained within is identical.
Typically Appropriate
Typically Inappropriate
Script Code (Smart Contracts)
Images
Dapp State Data
Movies
Token Balances
Music
Oracle Data
PDFs
Data Hashes (Anchoring)
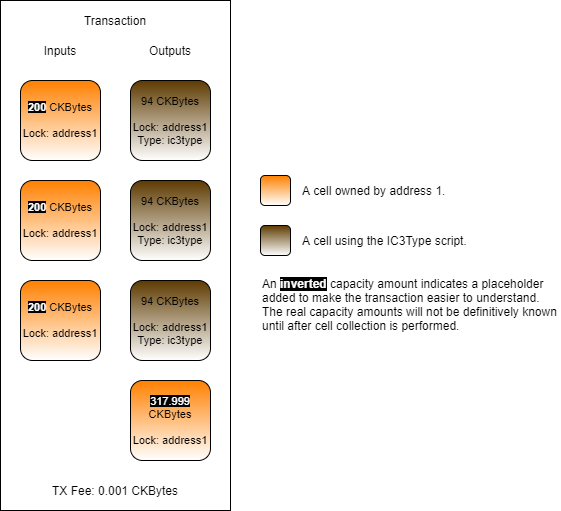
Complete the transaction in index.js found in the folder Lab-Updating-Data-in-a-Cell-Exercise by adding code and values as necessary.
Your code should locate the two existing cells which have data matching the contents of HelloNervos.txt. Update one with the contents of HelloWorld.txt. Update the other with the contents of LoremIpsum.txt.
Your resulting transaction should contain:
Two inputs from address1 that contain the data from the file HelloNervos.txt.
One or more extra inputs from address1 if more capacity is needed.
One output to address1 that contains the data from the file HelloWorld.txt.
One output to address1 that contains the data from the file LoremIpsum.txt.
One output to address1 with the change from the transaction, if necessary.
A transaction fee.
In this lab exercise, all of the core cell management logic has been removed. You must construct it yourself. Feel free to copy and paste some of your code from previous exercises to complete this lab exercise, but it's recommended that you try to write as much of the code as possible.
Provide code to locate the two input cells that contain data matching the contents of files/HelloNervos.txt.
Update the data in those two cells with the contents of files/HelloWorld.txt and files/LoremIpsum.txt by creating two output cells.
If more input capacity is needed, add more input cells as necessary.
If a change cell is needed, add an output as needed.
Run your code by opening a terminal to the Lab-Updating-Data-in-a-Cell-Exercise folder and running node index.js. If you get stuck you can find the solution in the Lab-Updating-Data-in-a-Cell-Solution folder.
Once your code successfully executes, the resulting transaction ID will be printed on the screen.
In the last lab exercise, you may have noticed that the command you used to verify that your outputs is called get_live_cell. It's called this because, in Nervos' terminology, both inputs and outputs are canonically referred to as "cells".
A cell is the most basic structure needed to represent a single piece of state data. The design is inspired by Bitcoin's outputs, but cells have more flexible functionality. Cells can be used to represent any kind of on-chain asset type on Nervos, such as tokens, NFTs, and wrapped assets.
Below are the terms used for the Nervos Cell Model. We will stick to the Nervos terminology going forward, but know that it is not uncommon for others to use Bitcoin terminology when speaking about Nervos.
A cell can only be used as an input to a transaction a single time, just like we covered in the last lesson. A live cell is one that has not been used as an input cell and is available to be used. A dead cell is one that has already been consumed by using it as an input cell and is no longer available for use.
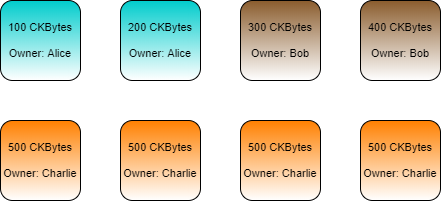
Every cell has an owner, and an individual can own any number of cells. In the illustration below, Alice, Bob, and Charlie each own several cells with different balances.
Alice has two cells for a total of 300 CKBytes.
Bob has two cells for a total of 700 CKBytes.
Charlie has four cells for a total of 2,000 CKBytes.
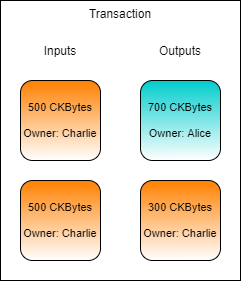
Let's say that Charlie wants to send 700 CKBytes to Alice. To create a transaction, the relevant live cells must be gathered for use as inputs in a process called cell collection. Charlie has four cells available that could be used, but none of them have enough to send Alice 700 CKBytes, so we will need to use multiple cells.
During cell collection we need at least 700 CKBytes to pay Alice, so we gather two cells to cover that amount. Our total Input cells contain 1,000 CKBytes, but Charlie only wants to send 700 CKBytes to Alice. This means Charlie needs to send 300 CKBytes back to himself as change.
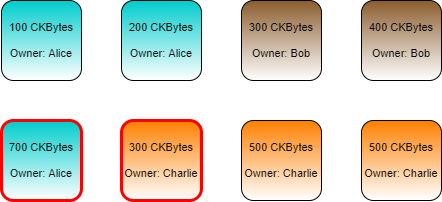
After the transaction has confirmed, the cells which were used as inputs will be consumed, and two new cells will be created. The new cells created in the transaction are outlined in red below.
Nervos uses small programs known as "scripts" to provide on-chain programmability. This is how Nervos achieves smart contract functionality that is similar to other blockchain platforms. However, Nervos' approach is significantly different than most other platforms.
Nervos is based on the Cell Model, which we first introduced earlier. This is significantly different than the Account Model, which is used by most other platforms, including Ethererum. Both models can be used to create the same type of functionality, and build many of the same applications, but the approach that must be taken is conceptually very different.
Ethereum uses the Account Model, which is similar to having an account at the bank. Your account has a single number that represents your balance. You can also have balances for other tokens. Every balance amounts to a single number that is attached to an account and every account is a representation of a user's public key or an on-chain smart contract. Every action that occurs on the blockchain can be described in a simplified way as a change to a balance on an account.
Nervos uses the Cell Model, which cannot be compared to an account at the bank. It's more like having multiple smaller sums of money stored in multiple different safes. Each safe might have a different amount of money, and there isn't a single number that represents the total amount you have. Your total balance is the total amount of value that is stored in all the safes (known as cells). Every cell has an owner, that could be linked to a user's public key or an on-chain script. Every action that occurs on the blockchain can be described in a simplified way as a change to the balance of a cell.
Ethereum's programming model is sometimes described as being part of a contract-oriented paradigm. The developer builds programs, known as contracts, which dictate how on-chain state changes occur. Methods on the contract are used to control state changes. An example would be the transfer() method of an ERC20 token contract. This method is used to send tokens from one account to another. A developer initiates a state change by creating a transaction that includes the method to call and supplies the necessary arguments to the method.
Nervos' programming model is transaction-oriented. There are no methods on a contract to call. The developer builds programs, known as scripts, which validate how an on-chain state change is allowed to occur. A developer initiates a state change by submitting a transaction that describes a valid state change.
This image shows how a basic counter would be implemented on a contract-oriented model vs. a transaction-oriented model. In both models, the counter can be increased by exactly 1 per transaction. In the contract-oriented model, a transaction contains an execution call to the contract's inc() method which is used to increase the value of the state by 1. This call is executed on-chain to change the state.
In the transaction-oriented model, the transaction contains both the old state and the new state that we want to change it to. There is no method call. The transaction is validated on-chain by executing the appropriate scripts. If the validation is successful, the on-chain state is updated.
In the example image, we don't use cells or talk about inputs and outputs. This is because we are describing the process at a high conceptual level so it can be more easily compared. On Nervos, the transaction would look more like this.
The transaction fully describes the end result, even before the transaction has been broadcasted to the network. In the left cell, you see a data value of 5. This is the state that currently exists on the blockchain. On the right is the new cell, with an increased value of 6. You could put whatever value you want in the right cell, but only a transaction with a value of 6 would confirm. This is because the details of the transaction are being validated by scripts. The scripts being used are indicated by the Lock and Type fields on a cell, which are short for Lock Script and Type Script. We will explain more about these in the next lesson.
If this seems confusing or counter-intuitive, don't be discouraged. This is a brand new way of creating smart contracts, so it may be difficult to understand at first. It will become clear as we continue to work with it.
Any transaction on Nervos undergoes both generation and validation. A transaction describes a state change and is generated off-chain. When the transaction is broadcast to the network, it is validated on-chain by the lock scripts and type scripts.
Let's look at the counter transaction one last time.
This transaction would be generated off-chain. This could be done in several languages, but Javascript and Typescript are the most common. The transaction describes what should happen by indicating the current state (inputs) and the desired resulting state (outputs).
Once it is broadcasted to the network, the lock scripts and type scripts attached to the cells in the transaction will execute and validate the transaction.
Let's describe it another way by looking at the contract-oriented vs transaction-oriented image again.
In the contract-oriented version, the generator creates a transaction that describes what on-chain method should be called to update the state. It creates a transaction which indicates that the contract.inc() method should be called. When the transaction is executed on-chain, it calls the contract.inc() method to change the state. This method will retrieve the current state value, increase it by 1, then update the state.
In the transaction-oriented version, that same logic is still used, but it distributed differently between the off-chain and on-chain components. The off-chain generator calls the contract.inc() method which will retrieve the current state value, and increase it by 1. But it can't save it directly since this is executing off-chain. To save the new state value, it must form a transaction that describes the state change, then broadcast it to the network. The on-chain scripts then validate that the indicated change is valid, then update the state.
This approach is less intuitive at first, but it has several distinct advantages.
Scalability - The process of generation is usually more computationally intensive than validation. We can take advantage of this asymmetry to achieve better scalability. Moving generation off-chain will allow higher on-chain efficiency, resulting in higher TPS on equal hardware.
Deterministic - The resulting state is created by the generator and exists in the transaction before it is sent to the network. There is no possibility of side-effects, and there are no surprises. We can always be assured of the desired outcome once the transaction is executed on-chain.
No Erroneous Transactions - Any transaction that does not validate is immediately rejected by the network. The invalid transaction is not stored on-chain, and no transaction fees are paid. This reduces the storage cost of the blockchain and eliminates scenarios where a user submits a transaction that results in an error, but they still had to pay a transaction fee that isn't refunded.
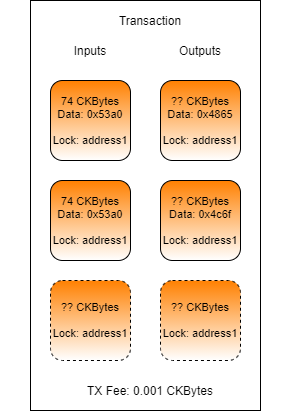
Updating the data in a cell is another common process that must be performed, but it's not quite as intuitive as one might think. Cells are immutable structures. Once they are added to the blockchain they cannot be modified in any way. The process to update the data of a cell is to consume an existing cell and then create a new one in its place.
In the above example image, Charlie is updating the data in a cell he owns. The input cell is consumed and effectively destroyed. In its place, a new cell is created with different data. Note: The transaction fee has been omitted from this example for simplicity.
In a sense, it isn't really an "update" at all because the cell being consumed has no direct connection to the cell being created. The process should be relatively simple at this point, but it is important to completely understand what is going on. Once we start working with smart contracts in later lessons, it will become apparent why this conceptual difference is very important.
Updating a cell in Lumos consists of first locating the existing cell to be updated, and then constructing the new cell to replace it. If we already know the out point of the cell we want to update then we can specify it directly, but for this example, we will rely on cell collection since it is a more common scenario.
To locate the existing cell, we will use the CellCollector() as we did previously, but we will need to update the query to only return cells that have the specific data we're looking for.
Here is the query that is used with the CellCollector() in the shared library function collectCapacity():
This is a simple query that searches for live cells that have a specific lock script and no type script. We will cover exactly what both of these mean in-depth in later lessons. What is important to know now is that it is searching for basic cells with a specific owner (lock) and without any smart contract (type) to consume for capacity.
To query for cells with specific data, all we have to do is add a third key for data:
This would limit the results of the query only to cells that contain no data. If we replace that with the data we are looking for, we will only get cells that contain that specific data.
This example code will create a query object to locate only the cells which have data matching the contents of the HelloNervos.txt file. This can be used with CellCollector() to query for live cells.
If you open the index.js file from the Updating-Data-in-a-Cell-Example folder in the Developer Training Course repo you will see the following code.
If you read through the comments, the intent of the code is quite simple. We locate a single existing cell and use it as an input, consuming it. We then create a new output, recycling the capacity from the consumed cell.
If you look through the rest of the code you will notice there is no additional cell collection and no creation of a change cell. This is because we knew ahead of time that the size of the data in the output cell is smaller than the input cell, and that we would have more than enough CKBytes.
Bitcoin
Nervos Cell Model
Input
Input Cell
Output
Output Cell
Unspent Output
Live Cell
Spent Output
Dead Cell
Spend
Consume
Complete the transaction in index.js found in the folder Lab-Calculating-Capacity-Requirements-Exercise by adding code and values as necessary.
Perform a manual cell collection and locate a usable live cell owned by the account ckt1...gwga and use it to populate the PREVIOUS_OUTPUT variable.
Hint: The last successful transaction we worked on earlier in this lesson will give you a usable out point matching this account. You should already have the TX hash.
Populate the TX_FEE variable with a 0.0001 CKByte fee.
Hint: The fee value must be given as a BigInt value expressed in Shannons. There are 100,000,000 Shannons in a CKByte.
Populate the output2 variable with a cell output structure that properly creates a change cell for any remaining CKBytes from the input cell.
Hint: You can copy the value of output1 to get the required structure, then just change what is necessary.
The transaction you create should have one input, two outputs, and a TX fee.
Run your code by opening a terminal to the Lab-Calculating-Capacity-Requirements-Exercise folder and running node index.js. If you get stuck you can find the solution in the Lab-Calculating-Capacity-Requirements-Solution folder, but don't use it unless you absolutely need it!
Once your code successfully executes, the resulting transaction ID will be printed on the screen without any errors.
Most transactions on Nervos have a very similar lifecycle. Regardless of which framework and tools are used, the general process of working with transactions is similar.
Most frameworks you will work with will start with some kind of a scaffold to produce a transaction. Across different frameworks and libraries, this may be called by different names. Some may call it a "skeleton", "builder", "raw transaction", or simply a "transaction". The syntax may be different, but the purpose is generally the same. It is an empty box into which the components of a transaction will be placed.
The next step is usually to add input cells. I say "usually" because sometimes output cells are added first. The order doesn't matter to the framework, but depending on the particulars of the transaction it may be easier to add one before the other to calculate capacity requirements and tx fees.
Live cells are gathered through the process of cell collection and added as inputs within the transaction. These cells are already on-chain, so they are represented by their out point; the transaction ID and index from where the cell originates. Often times frameworks will abstract this away allowing the developer to work with some kind of a live cell instance.
Output cells are cells that will be created after the transaction confirms. They do not exist on-chain yet, so there is no out point to reference. The developer must configure the cell with all details as necessary and then add it to the transaction.
After all the output cells are added to the transaction the total capacity required by the outputs will be known. If the capacity provided by the input cells is not enough, then a second round of cell collection may need to occur to add more input capacity.
Once the input cells and output cells are added to the transaction the capacity can be totaled for the inputs and outputs. In most cases, the capacity provided by the input cells and required by the output cells will not be an exact match. The capacity of the input cells will exceed the requirements of the output cells and the transaction fees. The left over capacity needs to be sent back to the original owner by creating a change cell and adding it to the transaction.
All transactions will have at least one dependency in the form of a cell dep or header dep. We will cover what these are and how to use them in the later lessons. For now, know that they are resources needed by the transaction. This can come in the form of smart contract binaries, libraries, modules, information about the blockchain itself, or many forms of data, like oracles.
After the input cells have been added to the transaction, authorization needs to be provided for those cells. To do this, the transaction is serialized and hashed by the library or framework to create a signing message. This message is signed by the private keys which own the input cells, and the resulting signature is added to the witnesses structure of the transaction. If there are multiple input cells in the transaction that have different owners, then one signature is required from each of the owner's private keys.
Since the transaction is serialized and hashed before generating the signing message, any change to the transaction after signing would invalidate the signatures provided. A new signing message would need to be generated and signed again by the owners of the input cells. This is important because it ensures that a signature cannot be copied from one transaction to another in a way that the signer didn't intend for.
The transaction may be completed, but until it is sent to the network no changes will occur on-chain. This is done by submitting the transaction to a CKB node using the RPC. The CKB node will validate the transaction, then broadcast it to the rest of the CKB nodes on the network.
When the transaction is broadcasted it isn't confirmed immediately. It will reside in the mempool, which is kind of like a waiting room for transactions that haven't been added to the blockchain yet. When a miner finds a block, they include transactions from the mempool, then broadcast the completed block to the network. Only after the block has been propagated and accepted by the rest of the network can it be considered confirmed.
In the previous chapter, we used the addressToScript() function to specify the owner of a cell. As the name indicates, this function converts an address into a script. Specifically, this function generates a lock script. This is possible because an address is actually just a lock script encoded in a way to make it human-readable. Let's take a deeper look at what is being generated when we run the following code.
When the above code is executed, lockScript will be set to the following.
The codeHash and hashType fields indicate what code should be executed. The codeHash value is a Blake2b hash that indicates what script code we need to execute, and hashType indicates how we need to treat code hash in order to match it up properly. The combination of the two together specifies what code should execute. If this doesn't make sense yet, don't worry. Later in this lesson, we will use it in an example that will make it perfectly clear.
The args value specifies the data that will be passed to the script when it executes. This is just like passing a few arguments to a command-line program. The value of the args field can be set to any value, and what is placed there is determined by the requirements of the script that is executing.
In the example above, the codeHash and hashType values specify the script code for the default lock. The args value is Blake2b hash of the owner's public key. When the transaction is submitted to the network, the default lock's script code will be executed and passed the args value. Using the args value in combination with the other values in the transaction, the default lock can make the determination if proper credentials were provided for this cell. If proper credentials were provided, a value of 0 is returned, indicating that execution was successful. If improper credentials were provided, then an error code will be returned, indicating that execution was not successful and that the transaction is invalid.
When any script executes, its purpose in doing so is to answer the question, "Is this transaction valid?" All scripts respond with a simple yes or no answer, in the form of an error code. A value of 0 means success and any other value means failure.
When building and testing scripts, it is very common to use a special script known as the "always success" script. This script will always give a "yes" answer when executed.
Let's take a look at the always success script logic in pseudo-code.
When the always success script is executed, it immediately returns with a value of 0, indicating success. There are no conditions here of any kind. This is the most simple script code that can be created.
The always success script is particularly useful for development and testing because it allows the developer to focus their scope and not have to worry about all the details that would be required in a production environment. When building a type script, it is very common for developers to specify the always success script as the lock script. This allows the developer to ignore typical lock script requirements in a transaction since they know it will always unlock the cell. This allows the developer to focus their attention on the type script.
The always success script should never be used as a lock script in a production environment. Anyone could consume the cell and immediately take the CKBytes without any permission. Since it is completely insecure, this is something we would only use for testing purposes.
Next, we will go through an example to use the always success script as a lock script in a transaction using Lumos. We're going to use a precompiled binary for this example to make things simpler. We will learn how to build and compile scripts our own scripts in a later lesson.
Open the index.js file from the Using-Scripts-Example folder. If you scroll down to the main() function, you will see that there four main sections.
Initialize - In the first three lines of code in main(), we initialize the Lumos configuration, start the Lumos Indexer, and initialize the lab environment.
Deploy Code - The deployCode() function creates a cell with the contents of the RISC-V binary located in the file ./files/always_success. This is the always success lock binary executable.
Create Cells - The createCells() function creates a cell that uses the always success lock.
Consume Cell - The consumeCells() function consumes the cell with the always success lock that we just created.
Let's go through the deployCode() function. This function generates and executes and transaction that will deploy the always success binary to a cell so it can be executed on-chain in lock scripts. Some of the code at the beginning and end is redundant from previous lessons, so we will only cover the relevant code.
This code should look familiar since we've used it several times before. We're reading the always success binary into a hex string, then creating a cell with the contents.
At the end of the function you will see this code:
We're returning the out point of the cell we just created so that it can be used in the next transaction.
Next, let's look at the createCells() function. This function generates and executes a transaction that will create a cell using the always success script code as a lock script. Once again, we'll skip straight to the relevant parts.
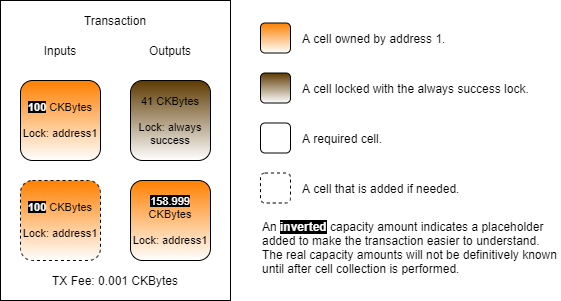
There are a few interesting things about this code. Look at the value of the outputCapacity1 variable. It's set to 41 CKBytes. You may be thinking, "isn't the minimum 61?" Yes, 61 CKBytes is the minimum for a standard cell using the default lock script, but we're not using the default lock script.
The lockScript1 variable defines the lock script for the cell. The codeHash is being set to a Blake2b hash of the always success lock script binary. The hashType is data1, which means to execute the code we just uploaded in V1 virtual machine. We will explain more about the meaning of hashType below. Finally, we have the args value. Notice that it's empty. Let's compare it to the args of a live cell using the default lock script.
When you use the default lock script, the args field is always expected to have a hash of the public key. However, this specific requirement applies only to the default lock script. The args field can contain any data in any format. It is the script in use that dictates how the data in the args should be formatted, or if it is even needed at all.
The always success script code does not use args in any way, so it doesn't need to be included. This saves that 20 bytes of space, and is the reason our cell only needs 41 CKBytes instead of the normal 61 CKBytes.
Even though this saves a little bit of space, it isn't practical to use in a production environment. The always success lock is completely insecure, which is why we only use it for testing purposes.
The resulting generated transaction will look something like this.
Both a lock script and a type script use codeHash and hashType to determine what code should execute. The codeHash specifies a value that is used to match the code to execute. The hashType value controls how the codeHash value should be interpreted.
Below are the possible values for hashType.
Using a hashType of data or data1 indicates that the codeHash value must match the Blake2b hash of the binary executable located in a cell. Using data means to always use CKB-VM version 0, and using data1 means to always use CKB-VM version 1. In this way Using data or data1 mean that the binary must be matched byte for byte which implies that they cannot be upgraded. This is the most decentralized and trustless approach since the script owner cannot change the functionality of the binary at a later time, and the same CKB-VM version will always be used.
Using a hashType of type indicates that the codeHash value must match the Blake2b hash of the type script on a cell. This method means that it will execute any binary code in a cell, as long as that cell has the proper type script attached to it. This allows for upgradeable scripts, which will be covered in a later section. Using type always executes in the newest available version of CKB-VM because it implies upgradeability, and that the maintainer is responsible for making sure their binary is compatible with the newest version of CKB-VM.
Our lock script uses the codeHash and hashType to determine what code should execute, but it does not specify where that code exists in the blockchain. This is where cell deps come into play.
We already learned about input cells and output cells in a transaction. Cell deps are the third type. Short for cell dependencies, cell deps are similar to input cells, but they are not consumed.
Since a cell dep is not consumed, it can be used repeatedly by many scripts as a read-only component of the transaction. This enables any resource specified as a cell dep to be reused repeatedly.
Some of the common uses of cells deps are:
Script Code - Any code that executes on-chain, such as the always success lock, is referenced in a transaction using a cell dep.
Script Libraries - Just like a library for a normal desktop application, a script library contains commonly used code for different scripts.
State Data - A cell can contain any data, including state data for a smart contract. Data from an oracle is a good example. The data published by the oracle is read-only and can be utilized by many smart contracts that rely on it.
With the addition of cell deps, our transaction now knows what code is needed, and where the code exists, making execution possible.
When the transaction is executed, every cell in the inputs will execute its lock script. The codeHash identifies what code needs to execute. The code that needs to be executed will be matched against the cell dep with a matching dataHash. The data field of the cell from the matching cell dep contains the script code that will be executed.
This method of providing resources enables code reuse in a way that is not possible on most other blockchains. Millions of cells can exist on-chain and all rely on a single cell dep that provides the code they need. This provides massive on-chain space savings and allows for complete code reuse between smart contracts.
Now let's look at the relevant parts of the consumeCells() function. This function generates and executes a transaction that will consume the cells we just created that use the always success lock.
This code adds cell deps to our transaction skeleton. On line 2 you see the function addDefaultCellDeps(). If we look into the shared library, we will see this:
We can see that this function is adding a cell dep for the default lock hash, and it's getting it from the locateCellDep() function. The locateCellDep() function is part of Lumos, and it can be used to locate specific well-known cell deps for the default lock script, the multisig lock script, and the Nervos DAO. This function is getting this information from the config.json file in the working directory.
However, we will not be able to use the locateCellDep function with the always success binary we just loaded, because it is not well-known. Instead, we construct a cell dep object which we add to the cell deps in the transaction using this code:
The depType can be either code or depGroup. The value of code indicates that the out point we specify is a code binary. The other possible value, depGroup, is used to specify multiple out points at once. We'll be covering how to use that in a future lesson.
If you look closely at the code in createCells() and consumeCells(), you will notice that we're only adding the always success lock as a cell dep in the consume function. The always success lock is referenced in the lock script of cells in both the create and consume functions, but we only need it to be referenced in the cell deps of the consume function is because that is the only time when it is executed.
A lock script executes when we need to check permissions to access a cell. We only need to do this when a cell is being used as an input, since this is the only time value is extracted from the cell. When creating an output, the value is coming from inputs that you have already proven you have permission to access. There is no reason you should have to prove ownership again, and therefore the lock script never executes on outputs, and we don't need to provide a cell dep to the always success binary since it isn't executing.
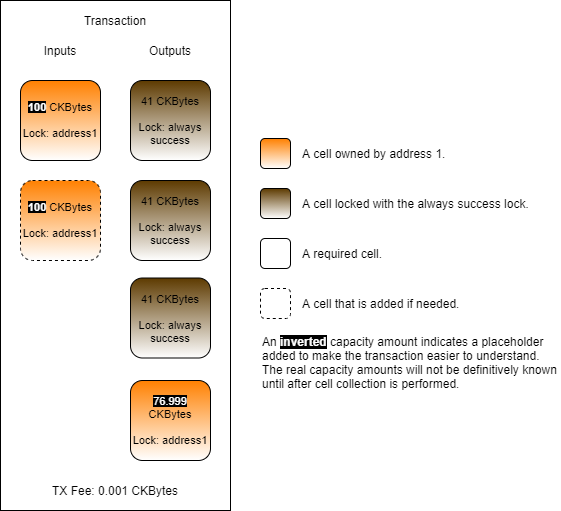
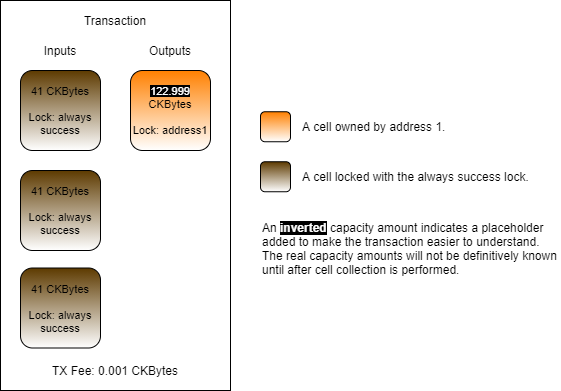
This code is adding our always success cell to the transaction, adding more cells for capacity, then sending everything back to ourselves as a single change cell. Remember, the always success cell we created only has 41 CKBytes in it. This is below a 61 CKByte standard cell and doesn't account for the necessary transaction fee.
Looking at the fourth block of code for the change cell, the lock is set to addressToScript(address1). This means it is using the default lock script again, and that 61 CKBytes is the minimum required.
The reason that capacityRequired in the code above is set to 61 CKBytes + the tx fee is because we are anticipating an output of a single standard cell and a tx fee.
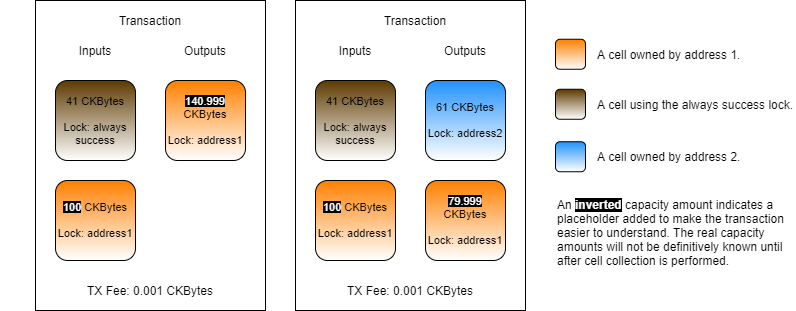
On the left is the transaction we are generating. We are consuming the always success cell and sending the value back to ourselves, so we only need one output.
On the right is what it would look like if we were sending to someone else. We would need more capacity since we would need an output to send to them, and a change cell. In that scenario, we would need at least 122 CKBytes (+ tx fee) since we are creating two output cells. We can reuse the 41 CKBytes on the consumed always success cell, meaning the absolute minimum capacity would need to collect is 81 CKBytes (122 - 41), plus the transaction fee.
This code looks standard and we've used it many times in the past, but it's important to point out why it's necessary for this transaction. The always success lock does not require any kind of signing in order to unlock. If it was the only input cell that existed, then we could skip this step. However, we had to add additional capacity from address1, and those cells use the default lock, which requires a standard signature in order to unlock.
Complete the exercise in index.js found in the folder Lab-Using-the-Always-Success-Lock-Exercise by adding code and values as necessary.
The existing code will initialize the lab and deploy the always success binary. Your code is responsible for generating the transactions to create and consume the cells.
Your createCells() transaction should contain:
One or more input cells from address1 that are used for capacity.
Three output cells that use the always success lock and contain 41 CKBytes.
One output to address1 with the change from the transaction.
A transaction fee of 0.001 CKBytes.
Your consumeCells() transaction should contain:
Three input cells that use the always success lock and contain 41 CKBytes.
One output to address1 with the change from the transaction.
A transaction fee of 0.001 CKBytes.
Feel free to copy and paste some of your code from previous exercises to complete this lab exercise, but it's recommended that you try to write as much of the code as possible.
Run your code by opening a terminal to the Lab-Using-the-Always-Success-Lock-Exercise folder and running node index.js. If you get stuck you can find the solution in the Lab-Using-the-Always-Success-Lock-Solution folder.
Once your code successfully completes all transactions a success message will be printed for the lab exercise.
We already mentioned that a script is a small program, but it is important to understand exactly what this means. In Nervos, a "script" is a very general term that indicates the code being executed to validate a transaction. This could refer to the data structure within a cell that indicates what script code should be executed or the script code binary that is executed. Often times "script" is used interchangeably with "smart contract" when speaking in a general sense.
When we talk about a script as data structure, we are talking about a structure that indicates what script code should execute, and what arguments should be passed to it. This script structure is used in every transaction. You already used it many times in the previous Lumos examples without realizing it. The addressToScript() function used to specify the owner of the cell generates this for us. In the next lesson, we will cover the details about this structure.
When we talk about a script in terms of the script code, we're talking about a binary executable. This is a small program that is executed during transaction validation. The executable itself is Linux ELF executable that uses the RISC-V architecture. This means that if you have Linux installed on a computer with a RISC-V CPU you can execute this same binary natively without any modification. When executed on the blockchain, script code is executed in CKB-VM, a high-performance virtual machine that is emulating a RISC-V CPU.
When a script executes, it validates the transaction, then returns an error code. Execution is always deterministic. Given the exact same transaction, execution of script code will always result in the same error code being returned. In this sense, a script is very similar to a pure function. There are never any side effects. Given the same inputs, the same output will always be generated.
When a script is executing it can read any of the details of the transaction as input data. These are things like the input cells and output cells, script args, data within cells, and witness data like signatures, all of which we will cover in later lessons.
After examining the relevant parts of the transaction, a script will generate and return an error code. This single number is the only piece of information a script can return as output data. A value of 0 indicates that execution was successful and the transaction has passed validation. Any other value indicates that there was an error during execution or that the transaction has failed validation.
A script validates transactions, which is in a sense like being asked the question "is this transaction valid?" After examining the transaction, the script must answer with either yes or no.
Nervos has two kinds of scripts, known as lock scripts and type scripts. Both are used to validate transactions, but their concerns different.
The concern of a lock script is ownership. It verifies that the owner of the cell authorizes it to be used in a transaction. This is commonly done using signatures, but more advanced transactions can use other means to unlock a cell for use when special conditions are met.
An example is the Anyone Can Pay lock script, or ACP for short. When you send CKBytes to someone, you must unlock the cell to extract the value. However, you must also unlock a cell to receive CKBytes from someone else in the same cell. The ACP lock allows this process to occur automatically when it detects that the cell value will increase rather than decrease. When taking value out of the cell, the ACP lock requires a signature to prove that they own the cell. When adding value to the cell, the ACP lock automatically unlocks and does not require a signature.
The concern of a type script is state transition. It verifies that the rules set by the developer are being followed in how state changes are allowed to occur in a transaction.
An example of type script usage is the creation of User Defined Tokens, or UDT for short. The type script includes all of the logic necessary to validate the formatting of the data inside a cell that represents a token, and the monetary policy of the token itself.
When describing smart contract functionality, the logic must be divided between the lock script and type script. Sometimes you only need one or other and sometimes both are required. However, it's not an even split. Type scripts tend to include most of the functionality that is typically associated with a smart contract, while lock scripts are more commonly used.
Let's look at the counter transaction image again.
The lock script is assuring that only address1 has the ability to unlock the value in this cell. They must provide a signature to unlock it. The counter type script is assuring that the data value is being updated by exactly 1 in each transaction. Since the current value is 5, only a value of 6 would be accepted.
Every cell requires a lock script, because every cell must have an owner. The owner could be a single person, multiple persons, or even no one, but lock script must always be present regardless. Every cell can also include a type script, but unlike the lock script, it is optional. A cell without a type script can hold CKBytes and data, but generally nothing more complex. A cell that holds an asset, such as a token, always has a type script to govern how it works.
Lock scripts and type scripts are used to add functionality to cells, but they also provide a second purpose, to provide a means of identifying and locating cells.
A cell is a relatively simple structure that contains the four fields we mentioned earlier:
Capacity
Data
Lock Script
Type Script
Looking at these four fields, it might seem like there is no way of distinguishing one type of cell from another. Every cell has an out point, but that is a location in the blockchain. There are millions of cells in the blockchain, and searching through all the out points would be infeasible.
When searching for cells that exist on the blockchain, the lock script and type script are the most common way of locating cells.
The lock script validates authority. In more simplistic terms, a lock script represents a particular owner. If we search for cells with a specific lock script, we are searching for cells with a specific owner.
The type script validates state transitions. In simplistic terms, a type script defines the behavior of a cell. If we search for cells with a specific type script, we are searching for cells that all exhibit common behavior; a specific type of cell.
Another difference between lock scripts and type scripts is when they execute.
Lock scripts execute on input cells. Type scripts execute on both input cells and output cells.
A lock script is concerned with ownership, and this is the reason that a lock script must execute on inputs. Once the lock script has validated the input cell, the value which was locked in that cell is now unlocked for usage. In most cases, the lock script does not need to be concerned with how the unlocked value is used. Therefore, there is no need for lock scripts to execute on output cells.
A type script is concerned with state transition, and this is the reason that a type script must execute on both inputs and outputs. A very common use for type scripts is the creation of tokens. The type script will contain all the logic of the token, including the monetary policy. One of the most simple monetary policy requirements is that a user cannot create more tokens out of thin air. This is enforced with a single simple rule: input_tokens >= output_tokens. In effect, this means you cannot send more tokens than you already have.
A type script can easily enforce the logic of this rule. When a cell uses this type script, it will execute and validate the transaction to ensure token balances on both input cells and output cells are in compliance with the rule. However, it can only perform this validation if it actually executes.
In the above image, there are four simplified transactions where all cells are using a simple token type script that enforces the input_tokens >= output_tokens rule. We are omitting CKBytes and TX fees to make it easier to understand on a conceptual basis.
Transaction #1 is a self-transfer. Alice is transferring 5 tokens to herself. The type script executes and checks to make sure that the rule is enforced. Alice has 5 tokens and is sending 5 tokens, so the type script would execute successfully.
Transaction #2 is a burn operation. Bob doesn't want his tokens anymore, so he is destroying them. He provides 5 tokens to the transaction, but there are no outputs. Since the type script rule uses >=, this is a perfectly valid transaction and would execute successfully.
Transaction #3 is another transfer. Alice has 5 tokens and is sending 3 to Bob, then sending 2 back to herself as change. The input and output token balances are the same, respecting the >= rule. This transaction is valid and would execute successfully.
Transaction #4 is a mining operation. Charlie is attempting to create 5 tokens out of nothing. This is in violation of the token rule, and this transaction is therefore invalid and would fail.
Type scripts execute on both inputs and outputs. What if type scripts were like lock scripts, and executed on inputs but not on outputs? Transactions #1, #2, and #3 would be unchanged since the token type script is still executing on inputs. However, transaction #4 would result differently. If type scripts did not execute on outputs, then the token type script would not execute at all in transaction #4. This would allow the transaction to succeed, allowing tokens to be created from nothing. This is why it is critical for type scripts to execute on both inputs and to properly validate a state transition.
All scripts are also subject to grouping as a method of optimizing script execution in CKB-VM. We mentioned earlier that a script is similar to a pure function. When a pure function is given the same inputs, it will always return the same result. Script execution also shares this same trait. Therefore it is not necessary to execute a script with the same input data more than a single time since the result will always be the same.
Identical scripts only execute once in a transaction.
When we say "identical script", we are referring to the data structure we mentioned earlier that indicates what script code should execute, and what arguments should be passed to it. In the case of the default lock, the argument passed is the public key. This means that a different script group is created for every different public key during script execution. Below is an image of a transaction to demonstrate this.
In this transaction, Alice and Bob are sending some CKBytes to Charlie. Let's first focus on the three input cells. Two are from Alice, and one is from Bob. The two cells from Alice both have the same public key as arguments, and therefore so they are put into a group. Bob's cell has a different public key, so that is put into a different group.
There are three input cells, but during execution, only two scripts will execute. One script will execute for Alice, and one will execute for Bob. Alice's cells both have the same public key and are in the same transaction, which means the input data is the same. There is no reason to execute the script on Alice's cells more than once. Just like a pure function, the script result will always be the same. Even if Alice had provided 100 cells in this transaction, execution would only occur once for that script group.
The importance of script groups will become more apparent in later lessons when we start to look at the deeper logic of scripts, and the process they must undergo to properly validate multiple cells during a single execution.
Capsule is a development framework used to create on-chain scripts using the Rust and C programming languages. This includes both lock scripts and type scripts. Capsule provides the necessary tools to bootstrap, compile, test, debug, and deploy a new project. We will give a quickstart here on Rust development to cover the basics of how Capsule is installed, and how a project is structured.
After Rust and Docker are installed, you can type the following to install capsule:
From a terminal, type the following command to create a new project called myproject in the current directory:
This should display the output similar to the following.
This initializes a capsule project called myproject and creates a single contract in the project called myproject within it. You can create as many contracts as you would like within a project using the capsule new-contract command, but we will start with the included default script.
Enter the project directory using cd myproject, then use the following command to build the project.
You should see output similar to this.
This builds the current project binaries in debug mode. Now that our binary is built, we can test it using the following command.
This will execute all tests for the project. The first time this runs, it may take a while to compile because it's building all the necessary testing tools including a light-weight simulator that will be used run the compiled scripts in a simulated blockchain environment. The output should be similar to this.
The tests ran successfully! 🎉
Next, we will look at how a project is structured. Open the myproject/contracts/myproject/src folder, which contains the source files for the myproject contract. You will see the following files.
entry.rs - This file contains the logic of the smart contract.
error.rs - This file contains error codes used in the project.
main.rs - This file contains boilerplate code for the contract.
Every Rust program begins with main.rs. Feel free to open it and take a look at what it contains, but we're not going to go through it here. This file is all boilerplate code that is needed to build a script. We won't need to touch anything in this file.
Next, let's look at the contents of entry.rs.
This file contains the main logic of the script. This example script contains boilerplate code and example code. Functionally, all it does is check if args were supplied to the script, and it gives an error if there were none.
Lines 1-14 are the various includes. Rust scripts must be programmed in no_std, which is why lines 2 and 6 import Result and Vec from somewhere else other than the Rust standard library. Line 16 imports the local error crate, which we will cover momentarily.
Lines 18 to 36 are all boilerplate example code. Lines 21 to 23 print the args for the executing script to the terminal. This is visible in the test output from earlier.
Lines 26 to 28 show how a custom error would be used. This would immediately return an error, which would, in turn, cause the transaction to fail with the indicated error code.
Lines 30 and 31 print the transaction hash to the console.
Line 33 is a demo code that allocates an unused vector as a buffer.
Line 35 exits the script with success.
Next, let's look at error.rs.
This file contains all the possible error codes for our script.
Lines 6 to 9 are the standard errors that could be returned from the CKB node. Lines 14 to 25 map the system error codes to those used in our script on lines 6 to 9.
Line 11 is our custom error. We can add as many as are needed here. Any time a script fails an error code will be returned. This is very useful for debugging and testing.
Now that you understand the basic structure of a project, you will be able to better understand the example scripts. We will cover more of Capsule's features in another lesson.
Our lessons going forward will make use of a number of example lock scripts and type scripts. These are contained in a separate GitHub repo. Use the command below to clone the Develop Training Course Script Examples into a directory of your choosing.
Next, enter the directory and build all the script binaries.
After the build is completed, run all the tests to verify that the scripts are built properly.
These scripts are intended to be used with the lessons, but feel free to experiment with any of these examples.
Our lessons will also have labs that utilize Capsule. These labs can be found in a separate GitHub repo. Use the command below to clone the Develop Training Course Script Labs into a directory of your choosing.
There is no need to build at this time. This step will be done during the lab exercises.
| Hash Type | Matching | CKB-VM Version |
|---|---|---|
Capsule can be installed on Linux, MacOS, and Windows via . Docker and Rust will need to be installed before Capsule will function properly.
You should already have Rust installed since it was a prerequisite to this course. Installation instructions for Docker can be found on . Docker must also be configured to .
If you experience any problems, the full instructions can always be viewed on the .
data
Match code by data hash.
0
type
Match code by type hash.
1 (always newest)
data1
Match code by data hash.
1
Complete the exercise in entry.rs in the folder Lab-OC5Type-Exercise/contracts/oc5type/src by adding code and values as necessary.
The name "IC3Type" stands for "input count 3". This type script counts the number of input cells available and only succeeds when that count is 3.
The name "OC5Type" stands for "output count 5". This type script counts the number of output cells available and only succeeds when that count is 5.
The entry.rs file contains the source code for the IC3Type script. Your task is to modify the functionality of this script to match that of OC5Type.
Build your code by opening a terminal to the Lab-OC5Type-Exercise folder and running capsule build, then test your code using capsule test after the build is successful. If you get stuck you can find the solution in the Lab-OC5Type-Solution folder.
Note: Be sure to always build your code after modifying it before it is tested again so that changes are properly reflected.
Once your code successfully compiles and all tests are passed, you have completed this lab. The test output will contain the following to indicate a successful test.
Complete the exercise in index.js in the folder Lab-Data10-Exercise by adding code and values as necessary.
The index.js file contains Lumos code to deploy, create, and consume cells using the Always Success lock script. Your task is to modify the functionality of this code to use the Data10 type script.
Change the binary that is used from always_success to data10.
Note: The data10 binary has already been compiled and provided. Do not change this binary or it may cause the lab to fail.
Update the createCells() function.
Create three cells that use the default lock with address1, and the data10 type script.
Each one of these cells should have a capacity of 104 CKBytes.
Each of these three cells should contain one of the following three strings, in this specific order: "HelloWorld", "Foo Bar", and "LoremIpsum".
Hint: Make sure that your createCells() function has the necessary cell deps. Remember: A lock script executes on inputs only. A type script executes on both inputs and outputs.
Update the consumeCells() function to consume the three cells that were created.
Hint: Modify the CellCollector() part of the code to locate the proper cells to add.
Run your code by opening a terminal to the Lab-Data10-Exercise folder and running node index.js. If you get stuck you can find the solution in the Lab-Data10-Solution folder.
Once your code successfully executes, the resulting transaction ID will be printed on the screen.
Complete the exercise in index.js in the folder Lab-JSONCell-Exercise by adding code and values as necessary.
The index.js file contains Lumos code to deploy, create, and consume cells using the Always Success lock script. Your task is to modify the functionality of this code to use the JSONCell type script.
Change the binary that is used from always_success to jsoncell.
Note: The jsoncell binary has already been compiled and provided. Do not change this binary or it may cause the lab to fail.
Update the createCells() function.
Create three cells that use the default lock with address1, and the jsoncell type script.
Each one of these cells should contain only the minimum capacity necessary to hold the cell data.
Each of these three cells should contain one of the following JSON objects, in this specific order: "Hello World!", ["Foo", "Bar"], and {"Lorem": "Ipsum"}.
Hint: Make sure that your createCells() function has the necessary cell deps. Remember: A lock script executes on inputs only. A type script executes on both inputs and outputs.
Update the consumeCells() function to consume the three cells that were created.
Hint: Modify the CellCollector() part of the code to locate the proper cells to add.
Run your code by opening a terminal to the Lab-JSONCell-Exercise folder and running node index.js. If you get stuck you can find the solution in the Lab-JSONCell-Solution folder.
Once your code successfully executes, the resulting transaction ID will be printed on the screen.
Every lock script and type script has the ability to evaluate the complete transaction that it is included in. One of the most common ways to do this is to inspect the cells that were included in the transaction. This is done by using syscalls (system calls) to load cells from the transaction.
Let's create a type script that counts the number of input cells available, and succeeds only when that count is 3. We will call this the "IC3Type" for short. Here is the psuedo-code for this type script.
This should be fairly straightforward, but there are a few small details to point out.
On lines 6 to 8, we load the input cells and cycle through them, but we don't actually look at the content of the cells since we are just counting them. It may seem like it would be more efficient to just use input_cells.length() to get the number of cells that were returned, but we wanted this code to better represent the real process. In actuality, cells can only be loaded one at a time in a syscall, and we have to load them one by one to count them.
Here is the real code that uses the Capsule framework, and is written in Rust. This code is available in the Developer Training Course Scripts repo in the file contracts/ic3type/src/entry.rs.
The beginning of the file is all imports, so we will skip straight to line 14. This is the number of input cells required to unlock the cell. We hard-coded this to keep the code simple.
On lines 23 to 33, we load and count all the input cells. The load_cell() function is the syscall we use to query for a single cell using an index and a source as arguments. The index value is the index of a cell in the transaction, and the source is where to load the cell from. For example, load_cell(0, Source::Input) loads the first input cell.
The load_cell() function returns a cell structure that we can examine, but in this example, we are just interested in counting the input cells. Even though we are only counting the cells, we still have to go through the process of loading each cell one at a time. On line 28, we successfully load a cell and count it.
On line 29, we handle an IndexOutOfBound syscall error. This is a special error that is received when we try to use load_cell() on an index that is higher than the number of cells that exist. It is normal to receive this error when iterating through all the available cells, because this error lets you know you have reached the end of what is available.
On lines 36 to 39, we check if the cell count matches the cells required, and return successfully if it matches.
On line 42, we return an error if the cell count didn't match. The error Unauthorized is a custom error code that is defined in the contracts/ic3type/src/error.rs file. Error codes are defined by the individual script, meaning you can define as many error codes as you need here.
Next, we will use the IC3Type script in a transaction using Lumos. We'll use a precompiled binary for this example to make things easy.
The code we will be covering here is in the index.js file in the Validating-a-Transaction-Example directory. Feel free to open the index.js file and follow along. This code example is fully functional, and you should feel free to modify and experiment with it. You can execute this code in a console by entering the directory and executing node index.js.
If you scroll down to the main() function, you will see that there four main sections. These are the same four sections as the previous Lumos example, and you will see this pattern often.
Initialize - In the first three lines of code in main(), we initialize the Lumos configuration, start the Lumos Indexer, and initialize the lab environment.
Deploy Code - The deployCode() function creates a cell with the contents of the RISC-V binary located in the file ./files/ic3type. This is the ic3type script binary executable.
Create Cells - The createCells() function creates a cell that uses the ic3type script.
Consume Cell - The consumeCells() function consumes the cell with the ic3type script that we just created.
The initialization and deployment code is nearly identical to the previous examples, so we're not going to go over it again unless there is specifically something different we need to point out. Feel free to review that code on your own if you need a refresher.
Next, let's look at the createCells() function. This function generates and executes a transaction that will create a cell using the always success script code as a type script. Once again, we'll skip straight to the relevant parts.
This code adds the required cell deps to the transaction. On line 2, we add the cells dep for the default lock, which is used on the input cells we need for capacity. On lines 3 and 4, we add the IC3Type binary. We will be creating IC3Type cells in the outputs, and these cells are using the IC3Type script as a type script. Remember, type scripts execute on inputs and outputs, which means we must provide the cell dep here so that execution can proceed.
Let's dig a little deeper into the addDefaultCellDeps() function on line 2. If we look into the shared library, we will see this:
We can see that this function is adding a cell dep for the default lock hash, and it's getting it from the locateCellDep() function. The locateCellDep() function is part of Lumos, and it can be used to locate specific well-known cell deps for the default lock script, the multisig lock script, and the Nervos DAO. This function is getting this information from the config.json file in the working directory.
However, we will not be able to use the locateCellDep function with the IC3Type binary because it is not well-known. Instead, we construct a cell dep object which we add to the cell deps in the transaction using this code:
The depType can be either code or depGroup. The value of code indicates that the out point we specify is a code binary. The other possible value, depGroup, is used to specify multiple out points at once. We'll be covering how to use that in a future lesson.
This code is used to generate the cells that use the IC3Type script. There are a few important things to point out.
On line 2, the value of outputCapacity1 is set to 96 CKBytes. The reason for this is that this cell is using a type script. Looking at lines 6 to 8, we see the structure of the type script. The codeHash field requires 32 bytes, the hashType field requires 1 byte, and the args field is empty. This is a total of 33 bytes, and 61 + 33 = 94.
On line 3, we create the lock script. We can see it is using the addressToScript() function from Lumos, so we know it is using the default lock script.
On lines 4 to 9, we define the type script. This structure should look familiar because it is exactly the same as the lock script that was used in a previous lesson for the always success lock. The only difference is that we are now using the data hash for the IC3Type binary instead of the always success binary.
On line 10, we create the cell structure for our output cell. Note that we now define the type field instead of leaving it as null. The lock field will never be null because a lock script is always required. The type field accepts the null value because a type script is optional.
On line 11, we add cells to the transaction. We push output1 three times, which creates three identical cells as outputs.
This code adds capacity to our transaction. We're not using the usual collectCapacity() function here because the IC3Type script requires exactly three input cells. Ensuring that we have enough capacity for the transaction and including exactly three input cells would take more complex logic, so we cheated a little bit here. Our initializeLab() function setup the cell configuration so we knew ahead of time that we would have three large cells available to fulfill the requirements of this transaction.
The resulting generated transaction will look similar to this.
Now let's look at the relevant parts of the consumeCells() function. This function generates and executes a transaction that will consume the cells we just created that use the always success lock.
This code adds cell deps to our transaction skeleton. This is the same as the createCells() code. Just like before, both the default lock script and the IC3Type script will be executed, so the script code for both is required.
This code is locating and adding the IC3Type cells we just created to the transaction. To do this, we use the CellCollector() class from the Lumos framework. By specifying the lock script and type script, we can query for live cells that match.
On lines 2 to 8, we define the lock script and type script to search for. These are set to the exact same values that we created the IC3Type cells with.
On lines 9 and 10, we form our query and create a CellCollector instance.
On lines 11 to 15, we locate and add exactly three cells matching the query. Once again, we're using simplified code for this because we know that we created exactly three cells in the previous transaction. Using simplified code is fine here because it is just an example, but if this was production grade code, we would need to add in a lot more boundary checking.
This code would be used to add in more required capacity for the transaction, but we won't need it in this example, and this is why it is commented out. Let's take a look at the resulting transaction.
Our three input cells provide a total of 282 CKBytes of capacity. This is more than enough capacity for the transaction to complete successfully.
In the last lesson, we learned how a type script can access and validate data in the output cells. To accomplish this we had to load our cells with load_cell(), then we had to check if they had the same type script before proceeding. This process works just fine, but there is a more efficient way to accomplish this same process using Script Groups.
In this example, we will use a type script that allows cells to be created only if the data field has valid JSON data. Any time a cell is created, the type script will read the data that the cell is being created with and validate it as a JSON string. Trying to create a cell containing invalid JSON will result in the transaction being rejected. We will call this the "JSON Cell" type script.
On the top left of the image is a transaction where the JSON Cell type script is used. The data area of the cell contains a valid JSON object. If this cell were created in a transaction, meaning it was added as an output, the type script would execute without error and the transaction would process successfully.
On the bottom left is a similar transaction using the JSON Cell type script, but the data area contains a malformed JSON object. If this cell were put into a transaction as an output, the type script would execute and return an error. This transaction would be rejected.
Next, we will look at the logic and code that would be used to create this type script.
Let's take a look at it in pseudo-code first to understand the logic.
On line 3, we load cells from the output group. This is different from the last lesson where we loaded all the output cells. The outputs could contain many different cells, but this script is only concerned with those also using the JSON Cell type script. We could check each cell, like we did in the last lesson, but this is a more simple way. The output group only the output cells that have a script that is the same as the one currently executing. We will explain more about how GroupOutput works momentarily.
On lines 4 to 10, we cycle through every cell in the output group, checking the data field of each one. If any of them contain invalid JSON data, an error is returned. We only check the outputs, because that is when the cell is created. When the cell is used as an input, we don't need to check again. This is because we already checked when the cell was created, and cells are immutable once created.
On line 12, we return successfully after no errors are found.
We first introduced script groups back in the Introduction to Scripting Part 2. Identical scripts are put into script groups and only execute once in a transaction. These groups can be accessed as the sources GroupInput and GroupOutput for several of the syscalls such as load_cell and load_cell_data. This allows us to retrieve only the cells within an execution group.
For example, if we had a token type script that was trying to enforce the rule input_tokens >= output_tokens, it would need to locate all of the token cells in the transaction. There could be other cells in the transaction, but our token type script isn't concerned with those. A "token cell" is defined by a cell using the token type script, so we only need to locate those cells. The GroupInput and GroupOutput sources will only return those matching cells. Below is an image to help illustrate.
In this image, Alice is sending two types of tokens, TokenA and TokenB. This image does not include CKBytes or TX fees to help make things easier to understand.
The cells representing TokenA have a red outline. The cells representing TokenB have a green outline. In this single transaction, Alice is sending 200 of TokenA to Bob, 100 of tokenA to Charlie, and 100 of TokenB to Daniel.
TokenA and TokenB will have different type scripts, and they will both execute in this transaction. Both scripts will enforce the rule input_tokens >= output_tokens. When the TokenA type script executes, it is only concerned with TokenA cells. When the TokenB type script executes, it is only concerned with the TokenB cells.
Both the TokenA and TokenB type scripts could use the Input and Output sources to do this. When they execute, they will see all of the cells in the transaction. You can see this in the image as Input 0 and Input 1 on the left, and Output 0, Output 1, and Output 2 on the right. Both the TokenA and TokenB type scripts will see these same cell indexes when they execute. The next step would be for each script to examine each cell, look at the type script that is used, and filter the results to only the cells of concern. This is how we did it in the last lesson, but script groups provide a more efficient way.
When the scripts use the GroupInput and GroupOutput sources, this filtration process is already available because script grouping is a part of the execution process.
When any script uses the regular Input and Output sources, they will see all the available cells. This is shown in the two left columns in the above image.
When TokenA uses GroupInput and GroupOutput, it will only see the cells of TokenA type. This is the single input cell with a red border and the two output cells with a red border. This is shown in the two middle columns of the above image.
When TokenB uses GroupInput and GroupOutput, it will only see the cells of TokenB type. These are the single input cell with a green border, and the single output cell with a green border. This is shown in the two right columns of the above image.
The use of GroupInput and GroupOutput works for type scripts as described, but it is slightly different for lock scripts. When a lock script uses GroupInput, the input cells with the same lock script will be returned. When a lock script uses the GroupOutput, no cells will be returned. The reason for this is that these groups are related to how scripts are being executed in CKB-VM, and lock scripts do not execute on outputs. We will describe exactly why this is later on.
Now let's look at the real version of the JSON Cell type script, written in Rust. This is located in the entry.rs file in developer-training-course-script-examples/contracts/jsoncell/src.
Lines 1 to 14 are all imports.
The core library is an alternative to the Rust standard library that has some basic structures and types that work in no_std mode.
The ckb_std library is the standard library used for developing Nervos scripts in Rust.
The lite_json library is used for JSON parsing.
Line 14 imports the custom error codes we have created for our script.
The lite_json library is an unmodified third-party library that we are using in our script. Any third-party libraries can be used in scripts as long as they support no_std mode and can be compiled for a RISC-V target. This gives script developers access to thousands of libraries which can used without modification.
Lines 16 to 30 contain the main logic for our type script. The Rust syntax is a little more complex than our pseudo-code, but code flow is very similar, and the length of the code isn't much longer.
On line 20, we use the load_cell_data() function to load cell data from the GroupOutput source with QueryIter(). Using GroupOutput eliminates the need to check the type script of each cell. Using script groups as sources is always preferred when possible, because it makes our code far more concise and efficient.
On line 23, we parse the raw data into a UTF-8 string, and if an error occurs during decoding we trap the error and map it to InvalidStringData.
On line 26, we parse the UTF-8 encoded JSON string. If the string is invalid, we trap the error and map it to InvalidJson.
On line 29, if no errors were detected, we return success.
Inspecting the data within cells is another common operation for evaluating the validity of a transaction. Next, we will create a cell that only allows a limited amount of data to be stored within it by using a type script.
The type script we use will read the data that the cell is being created with and validate the size of data as being 10 bytes or less. Trying to create a cell containing more than 10 bytes of data will result in the transaction being rejected. We will call this the "Data10" type script.
On the top left of the image is a transaction where the Data10 type script is used. The data area of the cell contains a string that is 10 bytes or less. If this cell were created in a transaction, meaning it was added as an output, the type script would execute without error and the transaction would process successfully.
On the bottom left is a similar transaction using the Data10 type script, but the data area contains a string much larger than 10 bytes. If this cell were put into a transaction as an output, the type script would execute and return an error. This transaction would be rejected.
Next, we will look at the logic and code that would be used to create this type script.
Let's take a look at it in pseudo-code first to understand the logic.
On line 3, we load the currently executing script. This is needed for comparison later on.
On line 5, we load the outputs. This will return all of the outputs in the current transaction we are validating.
On line 6, we begin iterating through each output cell.
On line 8, we check if the output cell's type script matches the currently executing script. We do this because we are only concerned with cells that use the same type script, but there could be other cells in the transaction. This is part of what is known as the the minimal concern pattern, which we will cover in more depth later. What's important to know now is that our script is only validating cells that have the Data10 type script.
On lines 10 to 13, we check the length of the data field. If it has data larger than 10 bytes, an error is returned.
On line 17, we return successfully after no errors are found.
Our code only checks the outputs, because that is when the cell is created. When the cell is used as an input, we don't need to check again. This is because we already checked when the cell was created, and cells are immutable once created. However, it would also be acceptable to validate all the Data10 cells in the inputs in addition to the outputs. This would consume slightly more cycles, but it is acceptable as a security precaution.
Now let's look at the real version of the Data10 type script, written in Rust. This is located in the entry.rs file indeveloper-training-course-script-examples/contracts/data10/src.
Lines 1 to 11 are all imports of dependencies.
The core library is an alternative to the Rust standard library that has some basic structures and types that work in no_std mode.
The ckb_std library is the standard library used for developing Nervos scripts in Rust.
Line 11 imports the custom error codes we have created for our script.
On line 14, we set a constant for the maximum amount of data, 10 bytes.
On line 20, we load the currently executing script so we can compare it against each cell.
On line 23, we are usingQueryIter() to iterate through each loaded cell from the outputs. This removes the need for the extra code to check for errors like IndexOutOfBound. In most cases, if you have the option to use QueryIter(), you probably want to use it. On top of the iterator we use enumerate() so we can also track the current loop iteration in the i variable. This is optional, but we will need it later on.
On lines 26 to 30, we check if the current cell has a type script. Remember, a type script is optional on a cell. If there is no type script, we continue to the next cell.
On lines 33 and 34 we check if the cell's type script matches the currently executing type script. The outputs could contain multiple different cells, and we are only concerned with Data10 cells.
On line 37, we load the cell's data. We use the i variable to ensure we load data from the same index position in the outputs.
On lines 40 to 44, we check the length of the data. If the data is longer than 10, we return the error DataLimitExceeded.
On line 48, if no errors were detected in any of the Data10 cells, we return success.
Next, we will use the Data10 type script in a Lumos example. Our code will deploy the binary, create some cells using the Data10 script, then consume those cells that we just created to reclaim that capacity.
The code we will be covering here is located in the index.js file in the Accessing-Cell-Data-Example directory. Feel free to open the index.js file and follow along. This code example is fully functional, and you should feel free to modify and experiment with it. You can execute this code in a console by entering the directory and executing node index.js.
Starting with the main() function, you will see our code has the usual four sections.
The initialization and deployment code is nearly identical to the previous examples, so we're not going to go over it here. Feel free to review that code on your own if you need a refresher.
Next, we will look at the relevant parts of the createCells() function. This function generates and executes a transaction that will create cells using the Data10 type script.
This is the code that adds cell deps to the transaction. On line 2, the cells deps are added for the default lock. On lines 3 and 4, the cell dep is added for the Data10 type script. Type scripts execute both on inputs and outputs, so a cell dep is always needed.
This is the code logic that creates the cells that use the Data10 type script. It uses the messages provided on line 2, then loops through them creating three cells with the different data.
On lines 7 to 12, we define the type script for the cell. The syntax for this is the same as when we created lock scripts in the past, but it is added as the type instead of the lock when we generate the cell structure on line 14.
On line 13, we convert our message to a hex string, and then add it to the structure on line 14.
The resulting transaction will look similar to this. We are creating three cells using the Data10 type script, and all are the same except for the data contained within.
Next, we will look at the relevant parts of the consumeCells() function. This function generates and executes a transaction that will consume the cells we just created that use the Data10 type script.
Just like with the creation function, we add cell deps for the default lock script and the Data10 type script. The cells we created use the Data10 type script, but they are secured by the default lock. Both will execute on the inputs, so both require cell deps.
Here we add the cells with the Data10 type script to the transaction. Just like the previous example, we use the CellCollector() with the same lock script and type script that we created the cell with.
On lines 9, we specify the lock and type. We could also specify data here, but then we would have to use three different queries to locate our cells. We're more interested in using a single query to find all the cells we're interested in.
On lines 11 and 12, we add all the cells found to the transaction. This will add the three cells we created, but if there were more cells it would continue to loop, adding them all.
The resulting transaction will look similar to this.
A type script executes on both inputs and outputs, so the Data10 type script will execute here. It will query the output group, but it won't find anything. There is one output, but that doesn't have the same type script, so it will not be included when the output group is queried. Since there are no Data10 cells to validate, it will exit with success, allowing the cells to be consumed.
In the table below, you will see the relationship between the available syscall functions. Rust developers will want to use the high-level functions most of the time, but on occasion using a syscall may be necessary.
You don't need to memorize all the functions below, but it's a good idea to read through them so you have a general idea about what kind of information is available. We will introduce the most commonly used functions in the lessons to follow.
QueryIter allows for convenient iteration over the Rust high-level functions. Most of the CKB-STD high-level functions for loading a cell, header, input, or witness, can be used with QueryIter.
Using QueryIter is the preferred method of calling these functions because it is very concise, and it also abstracts away some of the most common boilerplate code needed to use these loading functions.
We will demonstrate how to use QueryIter in the next lesson. The reason we are mentioning it now is that it is used heavily with the Rust high-level functions shown above.
Most of the syscall functions also require a source to be provided as an argument. Here are the available sources:
You should already be familiar with Input, Output, and CellDep. These are used to load cells from the inputs, outputs, and cell deps structures from the transaction.
The HeaderDep source is used to load additional headers from previous blocks. This is typically used to provide a time reference in a transaction. We will cover headers in a later lesson.
The GroupInput and GroupOutput sources provide a filtered view of the inputs and outputs. When a lock script or type script is executing, a very common process is to locate the cells that also have the same lock script or type script. In our next lesson, we will show how this common process occurs.
Complete the exercise in entry.rs in the folder Lab-DataRange-Exercise/contracts/datarange/src by adding code and values as necessary.
The DataCap type script ensures that the data contained in the cell has a size that is equal to or less than the value specified in the script args.
The DataRange type script ensures that the data contained in the cell has a size that falls within a range specified by minimum and maximum values which are specified in the script args.
The entry.rs file contains the source code for the DataCap type script. Your task is to modify the functionality of this script to match that of DataRange.
The script args of the DataRange script takes two values, the minimum data size, and maximum data size.
The data size values specify the limits in bytes.
Both the minimum and maximum data size values are u32 LE values (4 bytes each).
You will not need to modify error.rs. This already contains the errors required for the DataRange type script.
Build your code by opening a terminal to the Lab-DataRange-Exercise folder and running capsule build, then test your code using capsule test after the build is successful. If you get stuck you can find the solution in the Lab-DataRange-Solution folder.
Note: Be sure to always build your code after modifying it before it is tested again so that changes are properly reflected.
Once your code successfully compiles and all tests are passed, you have completed this lab. The test output will contain the following to indicate a successful test.
In an earlier lesson, we created the Data10 type script, which only allows cells to be created with a maximum of 10 bytes of data. In the script, we hard-coded the limit to 10 bytes. This works, but we have to create a new script every time we want to change the size limit. We can avoid this limitation by placing the limit in the script's args field so it can be changed easily.
Lock scripts and type scripts both take args similarly to how a program would take an argument on the command line. This allows configuration data to be passed to the script without having to modify the script. You've already used this several times with the default lock, which takes a hash of a public key as in the lock script args field to indicate who owns the cell and has permission to unlock it.
Next, we will look at a type script that uses the args to specify the data limit. We will call this the "DataCap" type script.
On the top left of the image is a transaction where the DataCap type script is used. In the type script args field is the value 10, indicating a data limit of 10 bytes within the data field. The cell contains a string that is 10 bytes long. If this cell were created in a transaction, meaning it was added as an output, the type script would execute without error and the transaction would process successfully.
On the bottom left is a similar transaction using the DataCap type script, with the type script args set to a larger value of 20. The data area contains a string much larger than 20 bytes. If this cell were put into a transaction as an output, the type script would execute and return an error. This transaction would be rejected.
Next, we will look at the logic and code that would be used to create this type script.
Let's take a look at it in pseudo-code first to understand the logic.
On line 3, we load the max data size limit from the args.
On line 5, we load the output group. When this is called from a type script, the output group only includes only the output cells that have the same type script. The outputs could contain many different cells, but this script is only concerned with those using the DataCap type script, which is why we use the output group instead of just the outputs.
On lines 6 to 12, we cycle through every cell in the output group, checking the data field of each one. If any of them have data larger than max_data_size bytes, an error is returned. We only check the outputs, because that is when the cell is created. When the cell is used as an input, we don't need to check again. This is because we already checked when the cell was created, and cells are immutable once created.
On line 14, we return successfully after no errors are found.
Now let's look at the real version of the type script, written in Rust. This is located in the entry.rs file within the directory developer-training-course-script-examples/contracts/datacap/src.
Lines 1 to 11 are all imports of dependencies.
The core library is an alternative to the Rust standard library that has some basic structures and types that work in no_std mode.
The ckb_std library is the standard library used for developing Nervos scripts in Rust.
Line 11 imports the custom error codes we have created for our script.
Lines 13 to 41 contain the main logic for our type script. The Rust syntax is a little more complex than our pseudo-code since we have to do more validation, but the code flow is very similar.
On line 17 and 18 we load the raw bytes from the script's args. On lines 21 to 24 verify that the data in the args is exactly 4 bytes. Our script expects a u32 value, which is always 4 bytes. If the args length is not the expected size, we return an ArgsLen error. The data we retrieved from the args is still raw data at this point.
On lines 27 to 29 we convert the data from the args to a u32 value. We don't need to do any kind of validation here because we know that the data is exactly 4 bytes, and this can always convert into an u32 successfully.
On line 28, look at how the bytes to copy are specified using the 0..4 range. We can add multiple values to the args field by packing them next to each other, then specifying the ranges to read them out again.
On line 32, we use the load_cell_data() function to load cell data from the GroupOutput source. The load_cell_data() function can be used to load individual cells, but when combined with QueryIter() it can be used as a Rust Iterator, allowing us to cycle through all cells more easily.
On line 34, we check the length of the data. If the data is longer than cell_data_limit, we return the error DataLimitExceeded.
On line 40, if no errors were detected, we return success.
Next, we will use the DataCap type script in a Lumos example. Our code will deploy the script code, create some cells using the DataCap script, then consume those cells that we just created to reclaim that capacity.
The code we will be covering here is located in the index.js file in the Using-Script-Args-Example directory. Feel free to open the index.js file and follow along. This code example is fully functional, and you should feel free to modify and experiment with it. You can execute this code in a console by entering the directory and executing node index.js.
Starting with the main() function, you will see our code has the usual four sections.
The initialization and deployment code is nearly identical to the previous examples, so we're not going to go over it here. Feel free to review that code on your own if you need a refresher.
Next, we will look at the relevant parts of the createCells() function. This function generates and executes a transaction that will create cells using the DataCap type script.
This is the code logic that creates the cells that use the DataCap type script. It uses the messages provided on line 2, then loops through them creating three cells with the different data.
On line 7 we convert our limit of 20 bytes as a 32-bit little-endian value as hex bytes. This specific binary format is used because it is what is expected by DataCap type script. This value is added to the type script on line 12. We could set different limits here for each cell, but that would make it more difficult to collect the cells later. We'll explain more later when we cover cell collection.
On lines 9 to 13, we define the type script for the cell. The syntax for this is the same as when we created lock scripts in the past, but it is added as the type instead of the lock when we generate the cell structure on line 15.
On line 14 we convert our message to a hex string, and then add it to the structure on line 15.
The resulting transaction will look similar to this. We are creating three cells using the DataCap type script, and all are the same except for the data contained within.
Next, we will look at the relevant parts of the consumeCells() function. This function generates and executes a transaction that will consume the cells we just created that use the DataCap type script.
Here we add the cells with the DataCap type script to the transaction using the CellCollector() library function. To form our query to locate the cells we must specify the same lock script and type script that they were create with.
On line 3, we specify 20 bytes as the DataCap limit. This will locate all available DataCap cells because they were all created with a 20 byte value. As we mentioned earlier, we could have specified different values for each cell. However, it would then require multiple queries to find them.
On line 10, we specify the lock and type. We could also specify data here, but then we would have to use three different queries to locate our cells. We're more interested in using a single query to find all the cells.
On lines 12 and 13, we add all the cells found to the transaction. This will add the three cells we created, but if there were more cells it would continue to loop, adding them all.
The resulting transaction will look similar to this.
In the image, the three input DataCap cells are the same, except for the data contained within. Only one type script is pictured due to space considerations, but all three are the same.
A type script executes on both inputs and outputs, so the DataCap type script will execute here. It will query the output group, but it won't find anything. There is one output, but that doesn't have the same type script, so it will not be included when the output group is queried. Since there are no DataCap cells to validate, it will exit with success, allowing the cells to be consumed.
Scripts can access any information about the transaction that is being validated. All transaction information is retrieved by the script during execution by using .
Scripts written in Rust will use the CKB-STD library that provides both and . Scripts written in C will directly use the syscalls referenced in the RFC. Developers are recommended to use Rust whenever possible.
Complete the exercise in index.js in the folder Lab-DoubleCounter-Exercise by adding code and values as necessary.
The index.js file contains Lumos code to deploy, create, and consume cells using the Counter type script. Your task is to modify the functionality of this code to use the Double Counter type script.
Compile the doublecounter binary from the previous lab in release mode using capsule build --release, then copy it from build/release/ to the files/ folder.
Change the binary that is used from counter to doublecounter in index.js.
Update the createCells() function.
Create a cell that uses the default lock with address1, and the doublecounter type script.
The cell should contain only the minimum capacity necessary to hold the cell data.
The initial data values should be 42 and 9000.
The data field takes a hex string that must be prefixed with "0x". There should only be a single "0x" prefix even if there are two values included.
Update the updateCells() function to update the Double Counter cell that was created.
The first counter value should be increased by 1, the second value should increase by 2.
The data field of the input cell and output cell contains a single hex string for all values, even if there are multiple values contained within. Your code must properly encode and decode this value.
Run your code by opening a terminal to the Lab-DoubleCounter-Exercise folder and running node index.js. If you get stuck you can find the solution in the Lab-DoubleCounter-Solution folder.
Once your code successfully executes, the resulting transaction ID will be printed on the screen.
Complete the exercise in entry.rs in the folder Lab-DoubleCounter-Exercise/contracts/doublecounter/src by adding code and values as necessary.
The Counter type script ensures that the u64 value contained in the data area of the cell is incremented by exactly one each time the cell is transferred or updated.
The DoubleCounter type script ensures that the two u64 values contained in the data area of the cell are incremented each time the cell is transferred or updated. The first value must be incremented by exactly one, and the second value must be incremented by exactly 2.
The entry.rs file contains the source code for the Counter type script. Your task is to modify the functionality of this script to match that of DoubleCounter.
The DoubleCounter takes no script args.
Both counter values stored in the cell's data area should be u64 LE values (8 bytes each).
You will not need to modify error.rs. This already contains the errors required for the DoubleCounter type script.
Build your code by opening a terminal to the Lab-DoubleCounter-Exercise folder and running capsule build, then test your code using capsule test after the build is successful. If you get stuck you can find the solution in the Lab-DoubleCounter-Solution folder.
Note: Be sure to always build your code after modifying it before it is tested again so that changes are properly reflected.
Once your code successfully compiles and all tests are passed, you have completed this lab. The test output will contain the following to indicate a successful test.
Note: Our tests expect certain output values and also test error cases. If your script contains different logic for error handling, it may be reported as a failed test. If you have included better error handling than was expected by our tests, disregard the error. Good job!
Complete the exercise in entry.rs in the folder Lab-AggDoubleCounter-Exercise/contracts/aggdoublecounter/src by adding code and values as necessary.
The DoubleCounter type script ensures that the two u64 values contained in the data area of the cell are incremented each time the cell is transferred or updated. The first value must be incremented by exactly one, and the second value must be incremented by exactly 2.
The AggDoubleCounter type script is the same as the DoubleCounter type script, except that it allows multiple AggDoubleCounter cells to be aggregated together and processed in a single transaction.
The entry.rs file contains the source code for the DoubleCounter type script. Your task is to modify the functionality of this script to match that of AggDoubleCounter.
The AggDoubleCounter takes no script args.
Both counter values stored in the cell's data area should be u64 LE values (8 bytes each).
You will not need to modify error.rs. This already contains the errors required for the AggDoubleCounter type script.
Build your code by opening a terminal to the Lab-AggDoubleCounter-Exercise folder and running capsule build, then test your code using capsule test after the build is successful. If you get stuck you can find the solution in the Lab-AggDoubleCounter-Solution folder.
Note: Be sure to always build your code after modifying it before it is tested again so that changes are properly reflected.
Once your code successfully compiles and all tests are passed, you have completed this lab. The test output will contain the following to indicate a successful test.
Note: Our tests expect certain output values and also test error cases. If your script contains different logic for error handling, it may be reported as a failed test. If you have included better error handling than was expected by our tests, disregard the error. Good job!
Complete the exercise in index.js in the folder Lab-DataRange-Exercise by adding code and values as necessary.
The index.js file contains Lumos code to deploy, create, and consume cells using the DataCap type script. Your task is to modify the functionality of this code to use the DataRange type script.
Change the binary that is used from datacap to datarange.
Note: The datarange binary has already been compiled and provided. Do not change this binary or it may cause the lab to fail.
Update the createCells() function.
Create three cells that use the default lock with address1, and the datarange type script.
Each of these three cells should contain the following data size restrictions, in this specific order: (0, 10), (3, 12), (128, 256). These size pairs represent the minimum and maximum, respectively.
Each of these three cells should contain any data of your choosing, that matches the given size ranges.
Each one of these cells should contain only the minimum capacity necessary to hold the cell data.
Update the consumeCells() function to consume the three cells that were created.
Hint: Modify the CellCollector() part of the code to locate the proper cells to add.
Run your code by opening a terminal to the Lab-DataRange-Exercise folder and running node index.js. If you get stuck you can find the solution in the Lab-DataRange-Solution folder.
Once your code successfully executes, the resulting transaction ID will be printed on the screen.
Complete the exercise in index.js in the folder Lab-AggDoubleCounter-Exercise by adding code and values as necessary.
The index.js file contains Lumos code to deploy, create, and consume cells using the Double Counter type script. Your task is to modify the functionality of this code to use the Aggregatable Double Counter type script.
Compile the aggdoublecounter binary from the previous lab in release mode using capsule build --release, then copy it from build/release/ to the files/ folder.
Change the binary that is used from doublecounter to aggdoublecounter in index.js.
Update the createCells() function to create three cells using the aggdoublecounter type script.
The cells should contain only the minimum capacity necessary to hold the cell data.
The initial counter data values should be [0, 0], [42, 42], and [9000, 9000].
The data field takes a hex string that must be prefixed with "0x". There should only be a single "0x" prefix even if there are two values included.
Update the updateCells() function to update the Aggregatable Double Counter cells that were created.
The first counter value should be increased by 1, the second value should increase by 2.
The data field of the input cell and output cell contains a single hex string for all values, even if there are multiple values contained within. Your code must properly encode and decode this value.
Run your code by opening a terminal to the Lab-AggDoubleCounter-Exercise folder and running node index.js. If you get stuck you can find the solution in the Lab-AggDoubleCounter-Solution folder.
Once your code successfully executes, the resulting transaction ID will be printed on the screen.
Complete the exercise in index.js in the folder Lab-SUDT-Exercise by adding code and values as necessary.
The index.js file contains incomplete Lumos code to deploy, create, transfer, and consume cells using the SUDT type script. Your task is to add and modify the code as necessary to complete the transactions as instructed.
In this lab exercise, several pieces of the core logic has been removed. You must construct it yourself. Feel free to copy and paste some of your code from previous exercises to complete this lab exercise, but it's recommended that you try to write as much of the code as possible.
Compile the sudt binary from the previous lab in release mode using capsule build --release, then copy it from build/release/ to the files/ folder.
Update the createCells() function to create four cells using the sudt type script.
Three of the token cells should have Alice as the owner of the token, Alice as the owner of the cell, and should have the following token amounts: 100, 300, 700
The fourth token cell should have as the owner of the token, Daniel and the owner of the cell, and should contain 900 tokens.
Use the computeScriptHash() Lumos function to find the lock script hash which is used as arguments to the SUDT type script to define the owner.
Each of the four token cells should contain only the minimum capacity necessary.
Update the transferCells() function to transfer the three SUDT cells that were created for Alice.
Send tokens to the following people: Bob: 200, Charlie: 500, Alice: 400 (change)
Use the CellCollector() Lumos class to perform cell collection on Alice's three input cells.
Each of the three output token cells should contain only the minimum capacity necessary.
Update the consumeCells() function to burn Alice's remaining SUDT tokens.
Alice has decided she no longer wants her remaining tokens and decides to burn them.
The cell used for the token still contains capacity. These CKBytes must be recovered when the token cell is consumed.
Use the CellCollector() Lumos class to perform cell collection on Alice's three input cells.
Run your code by opening a terminal to the Lab-SUDT-Exercise folder and running node index.js. If you get stuck you can find the solution in the Lab-SUDT-Solution folder.
Once your code successfully executes, the resulting transaction ID will be printed on the screen.
CKB-STD High-Level Function | CKB-STD Syscall Function | Syscall RFC |
Script state is any form of data that needs to persist between transactions. This can include things like token balances, NFT attributes, or authentication information. State data is stored in a cell's data field, just like the other data we have stored. However, in our previous examples the script logic had little meaningful interaction with any values stored within a cell.
To demonstrate how we can work with script state, we will build a basic counter type script. The cell's data area will hold a single number that must be incremented by exactly 1 each time it is included in a transaction. We will call this the "Counter" type script.
On the top left of the image is a transaction where the Counter type script is used. The data area of the input cell contains a value of 1, and the output cell contains a value of 2. The type script will execute without error and the transaction will process successfully.
On the bottom left is a similar transaction using the Counter type script. The input cell has a value of 1, and the output cell has a value of 3. This is incrementing by more than 1. When the type script executes it will return an error and this transaction would be rejected by the network.
Next, we will look at the logic and code that would be used to create this type script.
Let's take a look at it in pseudo-code first to understand the logic.
On lines 3 and 4, we count the number of cells in the group input and group output. We do this so we can make certain determinations about the structure of the transaction based on these counts.
On lines 6 and 7, we check if there are no input cells, and immediately exit the program with success if there are none. This is done because we are checking if there are any Counter cells that are being incremented. If nothing is being incremented, then nothing needs to be checked so we can safely exit.
Lines 6 and 7 also handle the scenario where a Counter cell is being created for the first time. In that case there would be no input Counter cell, but there would be an output Counter cell. This allows the cell to be created, and simply assumes that the data is in the correct format. We will demonstrate better ways of handling this in the next few lessons.
On lines 9 and 10, we check if the group input count and group output count are both 1, and we return an error if they are not. We are doing this to ensure that the transaction is conforming to a specific structure that we can check effectively. If the input and output are both exactly 1, we know we can properly validate that the Counter value is incremented.
On lines 12 and 13, we are loading the input and output values from the cell's data area. This is done by loading the first cell from each group, then converting the binary data in the cell's data area into an integer.
On lines 15 and 16, we take the input and output values and compare them. We ensure that the output value was increased by exactly 1, and if it is not, we return an error.
On line 18, we return successfully after no errors are found.
Now let's look at the real version of the Counter type script, written in Rust. This is located in the entry.rs file indeveloper-training-course-script-examples/contracts/counter/src.
Lines 1 to 10 are the usual imports of dependencies.
Lines 12 to 50 contain the main logic for our type script. The Rust syntax is a little more complex than our pseudo-code, but the code flow is nearly identical.
On lines 16 and 17, we count the number of cells in the group input and group output.
On lines 20 to 23, we check if there are no input cells, and immediately exit the program with success if there are none. Just like with the pseudo-code example, this also handles the scenario where a Counter cell is created for the first time.
On lines 26 and 29, we check if the group input count and group output count are both 1, and we return an error if they are not. We are doing this to ensure that the transaction is conforming to a specific structure that we can check effectively. If the input and output are both exactly 1, we know we can properly validate that the Counter value is incremented.
On lines 32 to 35, we convert the data from the group input cell to a u64 value.
On lines 38 to 41, we do the same for the group output cell and convert the data to a u64 value.
On lines 44 to 47, we take the input and output values and compare them. We ensure that the output value was increased by exactly 1, and if it is not, we return an error.
On line 49, we return successfully after no errors are found.
Next, we will use the Counter type script in a Lumos example. Our code will deploy the type script code, create some cells using the Counter type script, then update the script state value stored in the data area.
The code we will be covering here is located in the index.js file in the Managing-Script-State-Example directory. Feel free to open the index.js file and follow along. This code example is fully functional, and you should feel free to modify and experiment with it. You can execute this code in a console by entering the directory and executing node index.js.
Starting with the main() function, you will see our code has four sections.
The initialization and deployment code is nearly identical to the previous examples, so we're not going to go over it here. Feel free to review that code on your own if you need a refresher.
Next, we will look at the relevant parts of the createCells() function. This function generates and executes a transaction that will create cells using the Counter type script.
This code creates a single Counter cell and adds it as an output. The code is very similar to the code from previous lessons, but there are a few things we want to point out.
On line 2, the capacity of the cell is being set to 102 CKBytes. This is the minimum amount of capacity necessary for the Counter cell. A basic cell secured with the default lock and no type script or data is 61 CKBytes. The addition of the type script is 32 bytes for the codeHash, 1 byte for the hashType, and 0 bytes for the empty args. The data field is a 64-bit integer, which is 8 bytes. 61 + 32 + 1 + 0 + 8 = 102
On line 10 and 11, we define the data value for the Counter cell. The value must be converted to a 64-bit LE encoded hex string, which is the requirement of the Counter type script. Other encodings can be used as long as they match both in the transaction generation code and the on-chain script, but generally binary is the most space and computationally format for on-chain scripts.
The resulting transaction will look something like this.
Now, we'll look at the relevant parts of the updateCells() function. This function generates and executes a transaction that will update the Counter type script's state.
This adds the existing Counter cell as an input to the transaction, using the given out point from the previous transaction. We're using the out point instead of cell collection this time because it is a little easier to structure in this example since this Counter cell does not allow for burning. This will be covered later on.
On line 2, getLiveCell() contains a third parameter set to true. This is a flag indicating that data should be returned with the cell that is returned. Retrieving a cell and retrieving the data for a cell requires two different system calls, so we only request the data if it is needed.
On line 3, we take the data from the input Counter cell and decode it from hex-encoded binary to a BigInt. This value will be used again during the creation of our output Counter cell.
This code adds a Counter cell to the outputs with the updated value. This code is nearly identical to the code in the createCell() transaction, except that on line 10, we insert an updated value that is exactly one higher than the input value.
The resulting transaction will look similar to this.
As we mentioned in an earlier lesson, a cell is an immutable structure. When an output cell is added to the blockchain in a transaction, it cannot be altered. Therefore, when we "update" a Counter cell, we are consuming the input Counter cell, and creating a new output Counter cell.
There is no direct association between the input cell and output cell. It is important to keep this in mind while developing scripts because the script logic must reflect this in order to process the transaction correctly. We will learn more about this in our next lesson.
One of the unique features of the Cell Model is that multiple cells can be combined into a single large transaction instead of creating separate small transactions. This process is called "aggregation". However, aggregation is only possible when scripts are programmed in a way flexible enough to allow it. In this lesson, we will demonstrate some of the basic principles of creating aggregatable scripts.
One of the most common ways to create an aggregatable script is to follow the minimal concern pattern. Following this pattern creates scripts that have composable cell logic that allows them to safely be combined in a single transaction with other cells of different types without affecting their operation.
To incorporate the minimal concern pattern a script should:
Process all cells in the current script group.
Allow any number of cells in the script group.
Ignore any cells that are not in the same script group.
Ignore extraneous data outside the scope of what is used.
In essence, a script should only check the minimal amount of information needed to ensure the validity of the cells it is concerned with validating.
Next, we will show an example of an Aggregatable Counter type script. But first, we will start by reviewing the pseudo-code for the original Counter type script as a quick refresher.
Now, let's take a look at what a transaction would look like if it contained multiple Counter cells.
This transaction would not execute successfully because the Counter type script would give an error. The offending lines in the pseudo-code would be 9 and 10. The Counter type script was only designed to process exactly one input and one output.
We need to update the script logic to be able to handle multiple cells. Here is the pseudo-code for the Aggregatable Counter.
The code starts out the same as the regular counter. On lines 3 and 4, we count the number of group input cells and group output cells. On lines 6 and 7, we immediately succeed if there are no input cells which allows for the creation of new Counter cells.
On lines 9 and 10, we check that the counts match 1:1. This is necessary in order to match up the inputs with the outputs and locate matches, but we no longer restrict the transaction to having one input and one output.
On line 12, we loop through each cell index.
On lines 14 and 15, we load the cell data from the inputs and outputs at the current index, then we convert the data from binary to integer values.
On lines 17 and 18, we compare the input value and the output value to ensure the output value is exactly one higher. If this is not a match, we return an error.
On line 21, we return success if no errors have occurred.
This code can take any number of Counter cells. The requirements are that while updating there must be one input for every output and that the updated output value for an input value must be at the same index.
Here is the real version in Rust.
The dependencies and boilerplate code are the same in this example as in the previous lessons, so we won't go over them. We'll only go over the main logic of the code.
On lines 15 to 29, we count the group input and group output cells, then perform some basic validation. The Aggregatable Counter type script uses the GroupInput and GroupOutput. This limits the scope of concern to only other Aggregatable Counter cells. It then checks the number of input cells, which is logically checking if the operation is creating cells, or updating cells. It then checks that the number of input and output cells is equal. This ensures that we have the proper structure to validate an update operation.
On line 32, we loop through all the cell indexes. On lines 35 and 36, we retrieve the data for the group input cell and group output cell at the current cell index.
On lines 38 to 46, we convert the input and output data to u64 values.
On lines 48 to 53, we check that the values are as expected, and return an error if it is not as expected.
On line 57, we return successfully if no errors were found.
Next, we will use the Aggregatable Counter type script in a Lumos example. Our code will deploy the type script code, create some cells using the Aggregatable Counter type script, then update the values of those cells.
The code we will be covering here is located in the index.js file in the Creating-Aggregatable-Scripts-Example directory. Feel free to open the index.js file and follow along. This code example is fully functional, and you should feel free to modify and experiment with it. You can execute this code in a console by entering the directory and executing node index.js.
Starting with the main() function, you will see our code has four sections.
The initialization and deployment code is nearly identical to the previous examples, so we're not going to go over it here. Feel free to review that code on your own if you need a refresher.
Next, we will look at the relevant parts of the createCells() function. This function generates and executes a transaction that will create cells using the Aggregatable Counter type script.
This block of code creates three Aggregatable Counter cells. This is very similar to the previous lesson, except that we are creating multiple cells now.
On line 2, we loop through the amounts that want to create cells with. This is the starting value for the Aggregatable Counter. Our script code does not restrict the starting value, so we can customize the starting point.
On line 12, we convert that amount into a u64 LE value in hex bytes and insert it into the cell structure on line 13, which is then added to the transaction on line 14.
The resulting transaction will look similar to this.
Now, we'll look at the relevant parts of the updateCells() function. This function generates and executes a transaction that will update the Aggregatable Counter type script's state.
This adds the existing Aggregatable Counter cells as inputs to the transaction, using the given out points from the previous transaction.
On line 2, we create an array to keep track of the values in each cell.
On line 5, getLiveCell() contains a third parameter set to true. This is a flag indicating that data should be returned with the cell that is returned. Retrieving a cell and retrieving the data for a cell requires two different system calls, so we only request the data if it is needed.
On line 6, we take the data from the input Aggregatable Counter cell and decode it from hex-encoded binary to a BigInt. These values will be used again during the creation of our output Aggregatable Counter cells.
This code creates the output Aggregatable Counter cells with the updated values. This code is very similar to the code in the createCell() transaction, except we update the value on line 12.
The resulting transaction will look similar to this.
We can update as many cells as needed in a single transaction, rather than having to create multiple transactions. This reduces the overhead involved with a transaction and on script execution since it is more efficient to have a script execute once and process multiple cells than it is to have a script execute multiple times to process a single pair of cells. This, in turn, reduces the computation cycles required and saves on transaction fees.
Complete the exercise in entry.rs in the folder Lab-ODDoubleCounter-Exercise/contracts/oddoublecounter/src by adding code and values as necessary.
The DoubleCounter type script ensures that the two u64 values contained in the data area of the cell are incremented each time the cell is transferred or updated. The first value must be incremented by exactly one, and the second value must be incremented by exactly 2.
The ODDoubleCounter type script is the same as the DoubleCounter type script, but it uses operation detection that includes the ability to burn.
The entry.rs file contains the source code for the DoubleCounter type script. Your task is to modify the functionality of this script to match that of ODDoubleCounter.
The ODDoubleCounter takes no script args and is not aggregatable.
Both counter values stored in the cell's data area should be u64 LE values (8 bytes each).
You will not need to modify error.rs. This already contains the errors required for the ODDoubleCounter type script.
If you need more examples of operation detection, feel free to review the code in the odcounter example.
Build your code by opening a terminal to the Lab-ODDoubleCounter-Exercise folder and running capsule build, then test your code using capsule test after the build is successful. If you get stuck you can find the solution in the Lab-ODDoubleCounter-Solution folder.
Note: Be sure to always build your code after modifying it before it is tested again so that changes are properly reflected.
Once your code successfully compiles and all tests are passed, you have completed this lab. The test output will contain the following to indicate a successful test.
Note: Our tests expect certain output values and also test error cases. If your script contains different logic for error handling, it may be reported as a failed test. If you have included better error handling than was expected by our tests, disregard the error. Good job!
Tokens are one of the most common use cases for smart contracts today. As of 2021, there are over 400,000 different tokens that have been created on various platforms. In this lesson, we will learn how to create a basic token on Nervos.
Next, we will look at a flow chart of the logic that that is used in the SUDT type script.
After script execution begins, the first step is to determine if it is running in owner mode. This is a form of operation detection which is used to check if the transaction is being executed by the user who created this token. If it is the owner of the token, then owner mode is enabled, and the script immediately exits successfully. This is the equivalent of a super-user mode, where all actions are permitted. If owner mode is not enabled, then validation continues.
The next step is to determine the total number of input tokens and the total number of output tokens. This is the total number of tokens in all of the inputs, and all of the outputs. To do this it must read the data of every token cell in the transaction, convert the data within the cell to a number, then tally the amounts to get totals for the inputs and outputs.
The next step is to check if the input tokens are greater than or equal to the output tokens. This single logical statement is the basis for enforcing the scarcity of the token. If the statement is not true, then there are more output tokens than there are input tokens. A user other than the owner may be trying to illegally mint tokens out of nothing. This would cause the script to immediately fail. If the statement is true, then the scarcity of the token is being preserved properly, and the script would exit successfully.
Next, we will review the code of the Rust implementation of SUDT. We will look at one section at a time to make it easier to understand, but you can review the full source code at any time by opening the entry.rs file in the directorydeveloper-training-course-script-examples/contracts/sudt/src.
This first block of code is the usual imports. Next, we have the definitions of the constants.
The LOCK_HASH_LEN value is the number of bytes for a lock hash. This is a 256-bit (32 byte) Blake2b hash of a populated lock script structure. A unique hash value represents a unique lock script, or in more simple terms, it represents a unique owner. We will explain why this is important shortly.
The SUDT_DATA_LEN value is the number of bytes in a u128. This is an unsigned 128-bit value, which is 16 bytes in length. We will use a u128 value to store the number of tokens in a cell.
Next, we will skip down to the main() function and walk through the application in the order it would execute.
On lines 4 to 6, we load the currently executing script, then extract the script args.
On lines 8 to 12, we check if owner mode is enabled. If it is enabled, the script immediately exits successfully.
On lines 14 to 16, we count the number of input tokens and output tokens from the GroupInput and GroupOutput sources.
On lines 18 to 22, we enforce the token's scarcity logic input_tokens >= output_tokens. If the statement is not true, then the script immediately exits with an error.
On lines 24 and 25, if no errors were found, then the script exits successfully.
The main() function has three mains sections:
Check if owner mode is enabled.
Determine the input and output token amounts.
Ensure that the token scarcity logic, input_tokens >= output_tokens, is enforced.
Starting with step 1, let's look at how check_owner_mode() is implemented.
On lines 4 to 8, we check the length of the script args. If the length of the args is not equal to LOCK_HASH_LEN (32 bytes), then the token cell was created with an invalid owner, and we return an error.
On lines 10 to 13, we check if owner mode is enabled. This is done by loading the lock hash from every input cell and checking if any of them match the lock hash that was specified in the type script args when the cell was created. If any of them match, then owner mode is enabled, otherwise, owner mode is disabled. This technique is called authorization delegation (aka authorization piggybacking), which is explained more below.
All of the input cells in the transaction have a lock script, and all of these lock scripts must execute successfully for the transaction to be successful. Therefore, our type script can assume that all input cells have been fully authorized and unlocked. When we search the input cells for a matching lock hash, we are checking if the owner of the token also authorized and unlocked one of the input cells. Our type script is delegating the responsibility of authorization by only checking for the existence of a specific lock script that includes the authorization logic.
The authorization delegation pattern is an extremely efficient way of determining if the owner authorized this transaction because it reuses lock script logic that would be present anyway. The only requirement is that at least one input cell from the owner must be included in the transaction. This is nothing out of the ordinary since at least one input cell is required in every transaction since someone has to pay the transaction fee.
The logic of authorization delegation can be difficult to grasp at first, but it is an important concept. We recommend that you take the time to fully understand this concept since it is essential to smart contract security.
On line 16, we return the detected owner mode.
Looking back at main(), if owner mode is detected, then we immediately exit successfully. If it isn't, then we continue validation by counting the number of input and output tokens. Next, we will look at determine_token_amount().
On lines 4 and 5, we create a variable for the total amount of tokens found.
On lines 8 and 9, we load the data from each cell in the specified source, and cycle through them. The source must always be either GroupInput or GroupOutput.
On line 12, we check if the length of the data loaded from the cell is >= 16 bytes, which is the size of a u128 value. If it was created with less than 16 bytes, then it was created incorrectly and is invalid. In this case, we return an error on line 25.
We use >= instead of == because are not restricting the data area to exactly 16 bytes. Our type script only uses the first 16 bytes, but more data could be present. A lock script could store extra data in that area. By allowing more data, this type script is implementing the minimal concern pattern. It is ignoring any extra data that is beyond its scope of concern.
On lines 14 to 17, the first 16 bytes of data in the cell are converted into a u128 value. On lines 20 and 21, this value is added to the total token amount.
On lines 29 and 30, we return the total number of tokens that were found in the specified source.
Looking back at main():
We run determine_token_amount() once for GroupInput and once for GroupOutput. This gives us two different numbers.
We then take those numbers and compare them to ensure that input_tokens >= output_tokens. This logic enforces token scarcity and if it is violated then an error is returned. This ensures that a normal user cannot mint new tokens. The owner can still mint tokens, because if owner mode was detected, then the script would immediately exit successfully, and this logic would never execute.
This simple statement ensures token scarcity while only including the bare minimum amount of logic. It does not care how many cells were in the transaction. It does not care who the owners of each cell are. It does not care if you are transferring cells, burning cells, or doing both at the same time. It only cares that token amounts are respected.
This script perfectly embodies the minimal concern pattern to allow aggregation and minimize the amount of computational resources that are required for execution. Not all scripts can be this simple, but this is a great example of how basic logic can be used to achieve complex functionality in the Cell Model.
At this point, you should be familiar enough with the Cell Model to see that writing scripts on Nervos is a distinctly unique process. The rules are inherently more abstract and conceptualizing the development of a dapp can be very challenging for those who are new.
When we build a transaction in the Cell Model, we describe the start and end state. The operation, meaning the intent of what the transaction is supposed to do, is not expressed directly. There is no transfer() function in the Cell Model that clearly indicates the intent. However, by analyzing the cell configuration, we can often determine what the intent was, and this can help make script construction more intuitive.
In the Cell Model, the four most common basic operations are Create, Transfer, Update, and Burn.
A Create operation occurs when a new cell is created for an asset, like a token.
A Transfer operation occurs when a user sends an asset to another user.
An Update operation occurs when a user updates some value within a cell.
A Burn operation occurs when a user destroys the cell containing an asset.
Your script can incorporate many other operations or custom operations for your dapp, but we will focus on these basic four for this lesson.
Next, we will look at an example of a counter that uses operation detection. We will call this the "ODCounter" for short. We're going to skip the pseudo-code example this time around, and instead take a look at a flow chart of the script logic, and then jump straight into the real Rust code.
The logical flow of the script is fairly straightforward. We determine the mode of operation, validate if necessary, and return either success or fail with an error code.
Now, we will review the code one section at a time to make it easier to understand, but you can review the full source code at any time by opening the entry.rs file in the directorydeveloper-training-course-script-examples/contracts/odcounter/src.
This first block of code is the usual imports. There is nothing special about this, but we're going to quickly peek into errors.rs to see the possible values of Error from line 10.
On lines 10 to 14, you see we have five distinct custom errors. This is more than any other script we went through in the past. The more complex the application, the more potential there is for errors to occur.
Trying to debug a transaction can be a taxing experience. Having descriptive and distinct error codes can greatly help with this, so it is always recommended that they be included.
Here we are defining the possible modes (operations) that our script will use. You may be wondering why there are only three instead of the four we said we would cover. There are only three here because, for the purposes of our counter, Transfer and Update are exactly the same.
Next, we will skip to the main() function and work through the application in the order it would execute.
The flow of the main() function is fairly simple:
Determine the mode of operation.
Validate according to the detected mode.
Return success or failure.
Starting with step 1, let's look at how determine_mode() works.
On lines 4 to 6, we count the group inputs and outputs.
On lines 8 to 20, we detect which mode of operation is in use based on the counts we just collected.
On lines 9 to 12, if the input count is 1, and the output count is 0, a burn operation is detected. Input cells are always consumed, and if a new cell is not created, the asset is effectively destroyed. Our previous counter scripts did not include burn functionality because we were trying to keep our script as simple as possible. However, burn functionality is highly recommended, because it allows the user to recover the CKBytes in the cell and remove it from the state once it is no longer needed.
On lines 13 to 16, if the input count is 0, and the output count is 1, a create operation is detected. This is also known as a minting operation. Most asset types will need to have some kind of special conditions for a create operation. It's common for the mining operation to be restricted in some way for store of value assets like tokens. We will demonstrate this in the next lesson.
On lines 17 to 20, if the input count is 1 and the output count is 1, a transfer operation is detected. A transfer is defined as the input cell being consumed, and the output cell is created with the same values, but having a different lock script which indicates a different owner.
As we mentioned earlier, we are combining the transfer operation with the update operation. An update is defined as the input cell being consumed, and the output cell is created with different values, but the same lock script. If the output cell was created with different values AND a different lock script, then both a transfer and update operation are occurring at the same time. For the purposes of our counter, we do not want to treat any of these operations differently, so we are combining these into a single mode.
On line 23, if no supported count pattern is recognized, we return an InvalidTransactionStructure error.
Now that we have detected the mode, let's look at the main() function once again.
If a burn operation is detected (line 7), we can immediately return success. If an error is detected (line 10), we immediately return the error. For create and transfer operations, we need to go through another layer of validation. Let's take a look at validate_create() first, and then the validate_transfer() function.
This code validates a create operation and should be fairly straightforward. It loads the cell data, and it ensures that the data is a zero u64 value. In the previous counter examples, we didn't check the value that a cell was created with. We skipped it to make the logic simpler, but it is generally a good idea to do so. This ensures that cells cannot be created with an invalid value that could cause undesired behavior.
On lines 4 to 9, we load the data from the first group input cell, then check that its data is exactly 8 bytes; the size of a u64.
On lines 11 to 16, we load the data from the first group output cell, and perform the same validation as we did on the input.
The check on the input data is a bit redundant. Since we validate the data of the output in validate_create() and we also validate the data of the output in validate_transfer(), there is no way for a cell to be created with malformed data. However, as we stated earlier, we do not consider it bad practice to check anyway.
On lines 21 to 27, we convert the raw input and output data to u64 values.
On lines 29 to 33, we check for an overflow scenario. The counter can only go so high before the value overflows and goes back to zero. It is extremely unlikely we would hit this scenario using a u64 value, but it is still good practice to check and deliver a proper error message.
On lines 35 to 39, we check that the output value is exactly one more than the input value, and deliver an InvalidCounterValue error if it doesn't match.
The validate_transfer() function is the longest chunk of code in our script, but most of it is data validation and conversion. Some of our previous counters skipped some of the data validation to keep things more simple in our examples, but it is always recommended that you never cut corners on a script intended for production. If you look closely, line 36 is the only piece of real counter logic!
Operation detection can be a helpful approach to better understand how a complex program operates. However, it may not always be the best solution. Operation detection can sometimes lead to unnecessary complications or functionality restrictions.
Our example had three discrete modes of operation, create, transfer/update, and burn. It is not aggregatable and is only capable of processing one mode at a time. However, it is possible to create an aggregatable counter that can handle all modes simultaneously without using operation detection.
What you should use will depend on the specifics of your project, and the architecture of your dapp. In the next lesson, we will demonstrate how operation detection is used in a production script.
To do this we will examine the SUDT standard, which stands for Simple User-Defined Token. SUDT is a minimalistic token standard, and the first official token standard to be released on Nervos. We use a Rust-based implementation that has specifically been formatted to be easier to read. The is written in C, but reviewing it is purely optional.