Validating a Transaction
Every lock script and type script has the ability to evaluate the complete transaction that it is included in. One of the most common ways to do this is to inspect the cells that were included in the transaction. This is done by using syscalls (system calls) to load cells from the transaction.
Let's create a type script that counts the number of input cells available, and succeeds only when that count is 3. We will call this the "IC3Type" for short. Here is the psuedo-code for this type script.
This should be fairly straightforward, but there are a few small details to point out.
On lines 6 to 8, we load the input cells and cycle through them, but we don't actually look at the content of the cells since we are just counting them. It may seem like it would be more efficient to just use input_cells.length() to get the number of cells that were returned, but we wanted this code to better represent the real process. In actuality, cells can only be loaded one at a time in a syscall, and we have to load them one by one to count them.
Here is the real code that uses the Capsule framework, and is written in Rust. This code is available in the Developer Training Course Scripts repo in the file contracts/ic3type/src/entry.rs.
The beginning of the file is all imports, so we will skip straight to line 14. This is the number of input cells required to unlock the cell. We hard-coded this to keep the code simple.
On lines 23 to 33, we load and count all the input cells. The load_cell() function is the syscall we use to query for a single cell using an index and a source as arguments. The index value is the index of a cell in the transaction, and the source is where to load the cell from. For example, load_cell(0, Source::Input) loads the first input cell.
The load_cell() function returns a cell structure that we can examine, but in this example, we are just interested in counting the input cells. Even though we are only counting the cells, we still have to go through the process of loading each cell one at a time. On line 28, we successfully load a cell and count it.
On line 29, we handle an IndexOutOfBound syscall error. This is a special error that is received when we try to use load_cell() on an index that is higher than the number of cells that exist. It is normal to receive this error when iterating through all the available cells, because this error lets you know you have reached the end of what is available.
On lines 36 to 39, we check if the cell count matches the cells required, and return successfully if it matches.
On line 42, we return an error if the cell count didn't match. The error Unauthorized is a custom error code that is defined in the contracts/ic3type/src/error.rs file. Error codes are defined by the individual script, meaning you can define as many error codes as you need here.
Usage in Lumos
Next, we will use the IC3Type script in a transaction using Lumos. We'll use a precompiled binary for this example to make things easy.
The code we will be covering here is in the index.js file in the Validating-a-Transaction-Example directory. Feel free to open the index.js file and follow along. This code example is fully functional, and you should feel free to modify and experiment with it. You can execute this code in a console by entering the directory and executing node index.js.
If you scroll down to the main() function, you will see that there four main sections. These are the same four sections as the previous Lumos example, and you will see this pattern often.
Initialize - In the first three lines of code in
main(), we initialize the Lumos configuration, start the Lumos Indexer, and initialize the lab environment.Deploy Code - The
deployCode()function creates a cell with the contents of the RISC-V binary located in the file./files/ic3type. This is the ic3type script binary executable.Create Cells - The
createCells()function creates a cell that uses the ic3type script.Consume Cell - The
consumeCells()function consumes the cell with the ic3type script that we just created.
The initialization and deployment code is nearly identical to the previous examples, so we're not going to go over it again unless there is specifically something different we need to point out. Feel free to review that code on your own if you need a refresher.
Creating Cells
Next, let's look at the createCells() function. This function generates and executes a transaction that will create a cell using the always success script code as a type script. Once again, we'll skip straight to the relevant parts.
This code adds the required cell deps to the transaction. On line 2, we add the cells dep for the default lock, which is used on the input cells we need for capacity. On lines 3 and 4, we add the IC3Type binary. We will be creating IC3Type cells in the outputs, and these cells are using the IC3Type script as a type script. Remember, type scripts execute on inputs and outputs, which means we must provide the cell dep here so that execution can proceed.
Let's dig a little deeper into the addDefaultCellDeps() function on line 2. If we look into the shared library, we will see this:
We can see that this function is adding a cell dep for the default lock hash, and it's getting it from the locateCellDep() function. The locateCellDep() function is part of Lumos, and it can be used to locate specific well-known cell deps for the default lock script, the multisig lock script, and the Nervos DAO. This function is getting this information from the config.json file in the working directory.
However, we will not be able to use the locateCellDep function with the IC3Type binary because it is not well-known. Instead, we construct a cell dep object which we add to the cell deps in the transaction using this code:
The depType can be either code or depGroup. The value of code indicates that the out point we specify is a code binary. The other possible value, depGroup, is used to specify multiple out points at once. We'll be covering how to use that in a future lesson.
This code is used to generate the cells that use the IC3Type script. There are a few important things to point out.
On line 2, the value of outputCapacity1 is set to 96 CKBytes. The reason for this is that this cell is using a type script. Looking at lines 6 to 8, we see the structure of the type script. The codeHash field requires 32 bytes, the hashType field requires 1 byte, and the args field is empty. This is a total of 33 bytes, and 61 + 33 = 94.
On line 3, we create the lock script. We can see it is using the addressToScript() function from Lumos, so we know it is using the default lock script.
On lines 4 to 9, we define the type script. This structure should look familiar because it is exactly the same as the lock script that was used in a previous lesson for the always success lock. The only difference is that we are now using the data hash for the IC3Type binary instead of the always success binary.
On line 10, we create the cell structure for our output cell. Note that we now define the type field instead of leaving it as null. The lock field will never be null because a lock script is always required. The type field accepts the null value because a type script is optional.
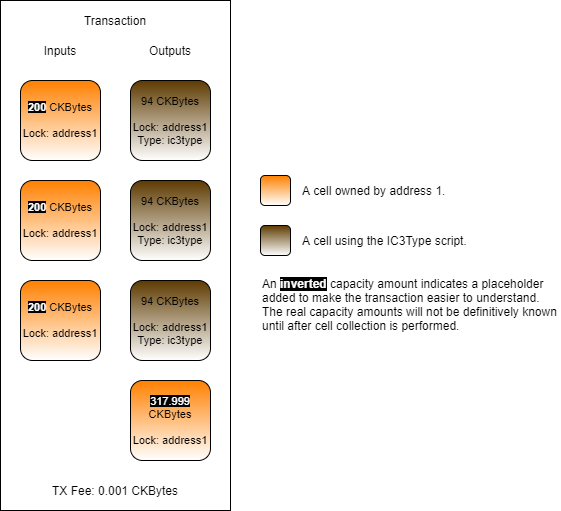
On line 11, we add cells to the transaction. We push output1 three times, which creates three identical cells as outputs.
This code adds capacity to our transaction. We're not using the usual collectCapacity() function here because the IC3Type script requires exactly three input cells. Ensuring that we have enough capacity for the transaction and including exactly three input cells would take more complex logic, so we cheated a little bit here. Our initializeLab() function setup the cell configuration so we knew ahead of time that we would have three large cells available to fulfill the requirements of this transaction.
The resulting generated transaction will look similar to this.
Consuming Cells
Now let's look at the relevant parts of the consumeCells() function. This function generates and executes a transaction that will consume the cells we just created that use the always success lock.
This code adds cell deps to our transaction skeleton. This is the same as the createCells() code. Just like before, both the default lock script and the IC3Type script will be executed, so the script code for both is required.
This code is locating and adding the IC3Type cells we just created to the transaction. To do this, we use the CellCollector() class from the Lumos framework. By specifying the lock script and type script, we can query for live cells that match.
On lines 2 to 8, we define the lock script and type script to search for. These are set to the exact same values that we created the IC3Type cells with.
On lines 9 and 10, we form our query and create a CellCollector instance.
On lines 11 to 15, we locate and add exactly three cells matching the query. Once again, we're using simplified code for this because we know that we created exactly three cells in the previous transaction. Using simplified code is fine here because it is just an example, but if this was production grade code, we would need to add in a lot more boundary checking.
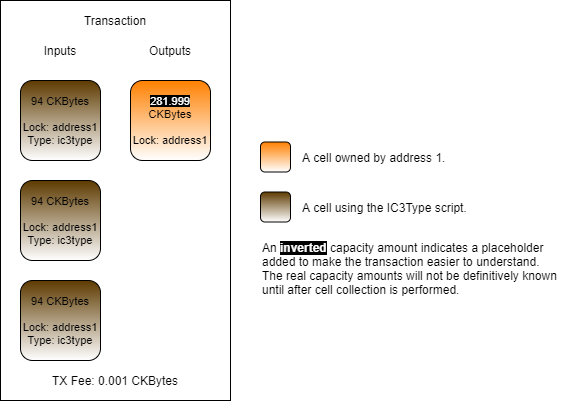
This code would be used to add in more required capacity for the transaction, but we won't need it in this example, and this is why it is commented out. Let's take a look at the resulting transaction.
Our three input cells provide a total of 282 CKBytes of capacity. This is more than enough capacity for the transaction to complete successfully.
Last updated